ViNext Upsell, Bundle, Funnel


Created: 01/2025 – Last updated: 02/2025

By: VINext

Thank you for purchasing our plugin. If you have any questions beyond this documentation’s scope, please feel free to request support at our Support Email. Thanks so much!

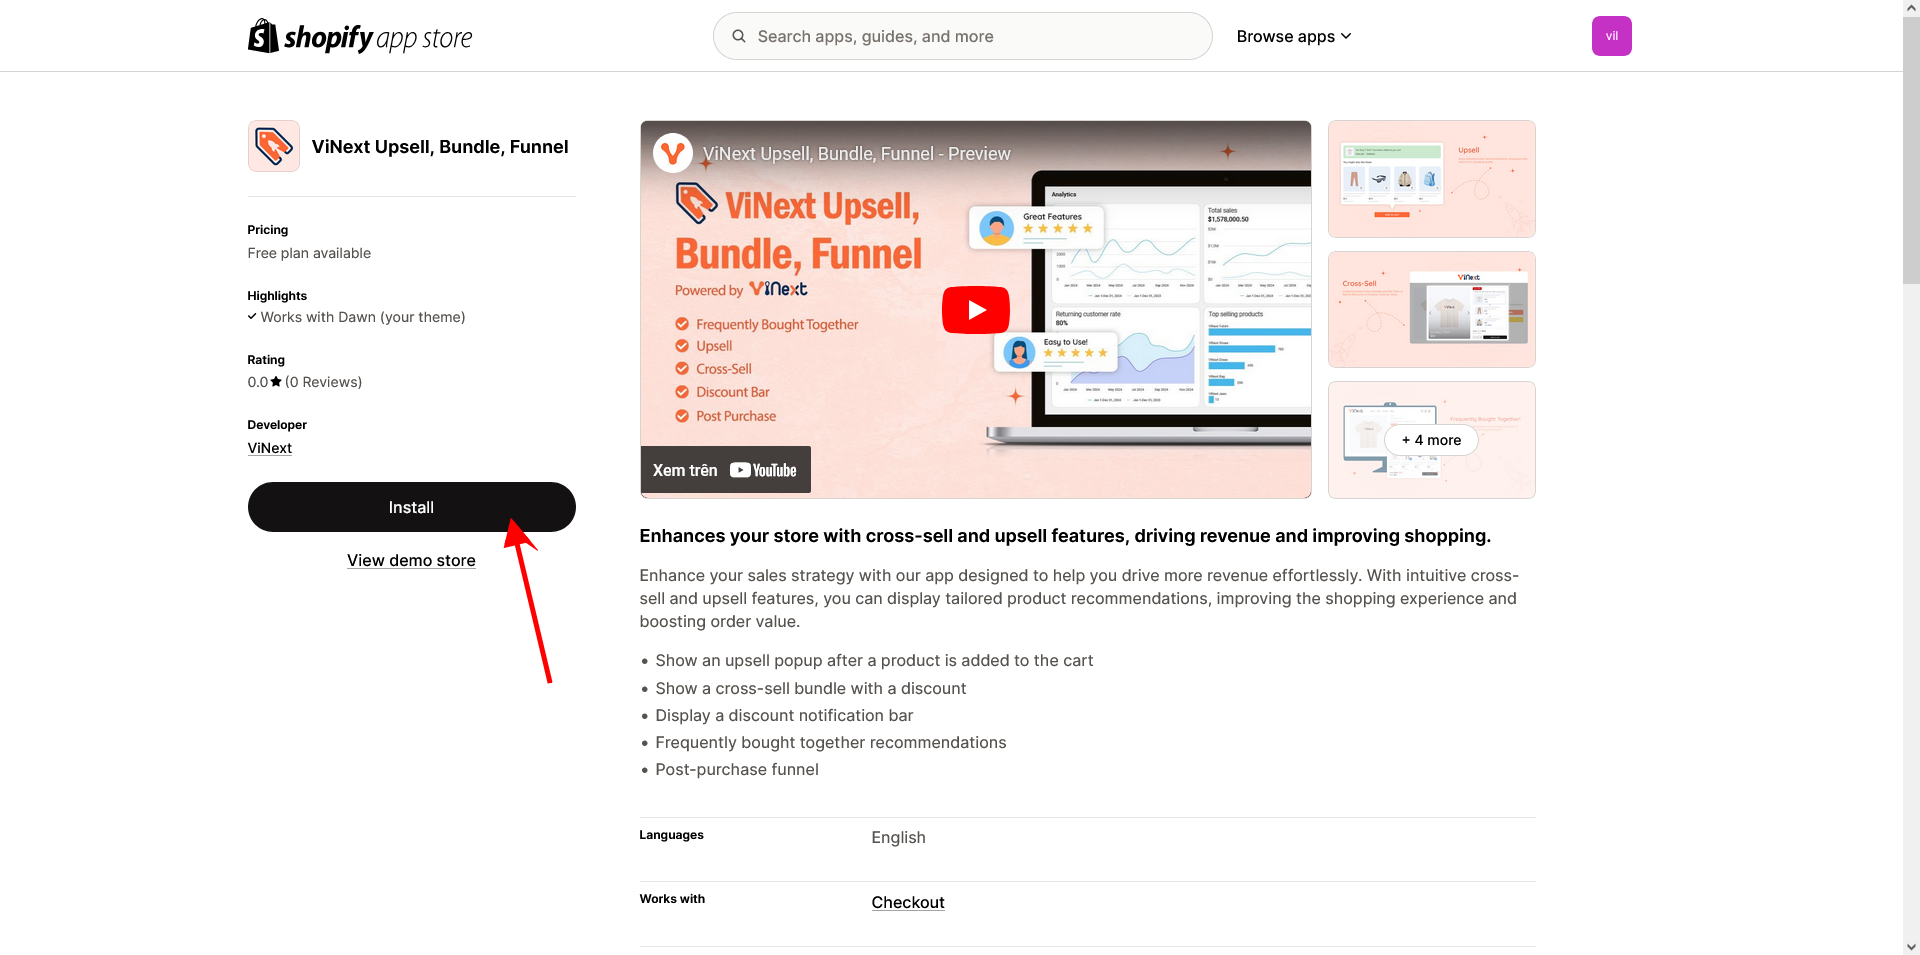
Use this direct link to the app >> Click “Install

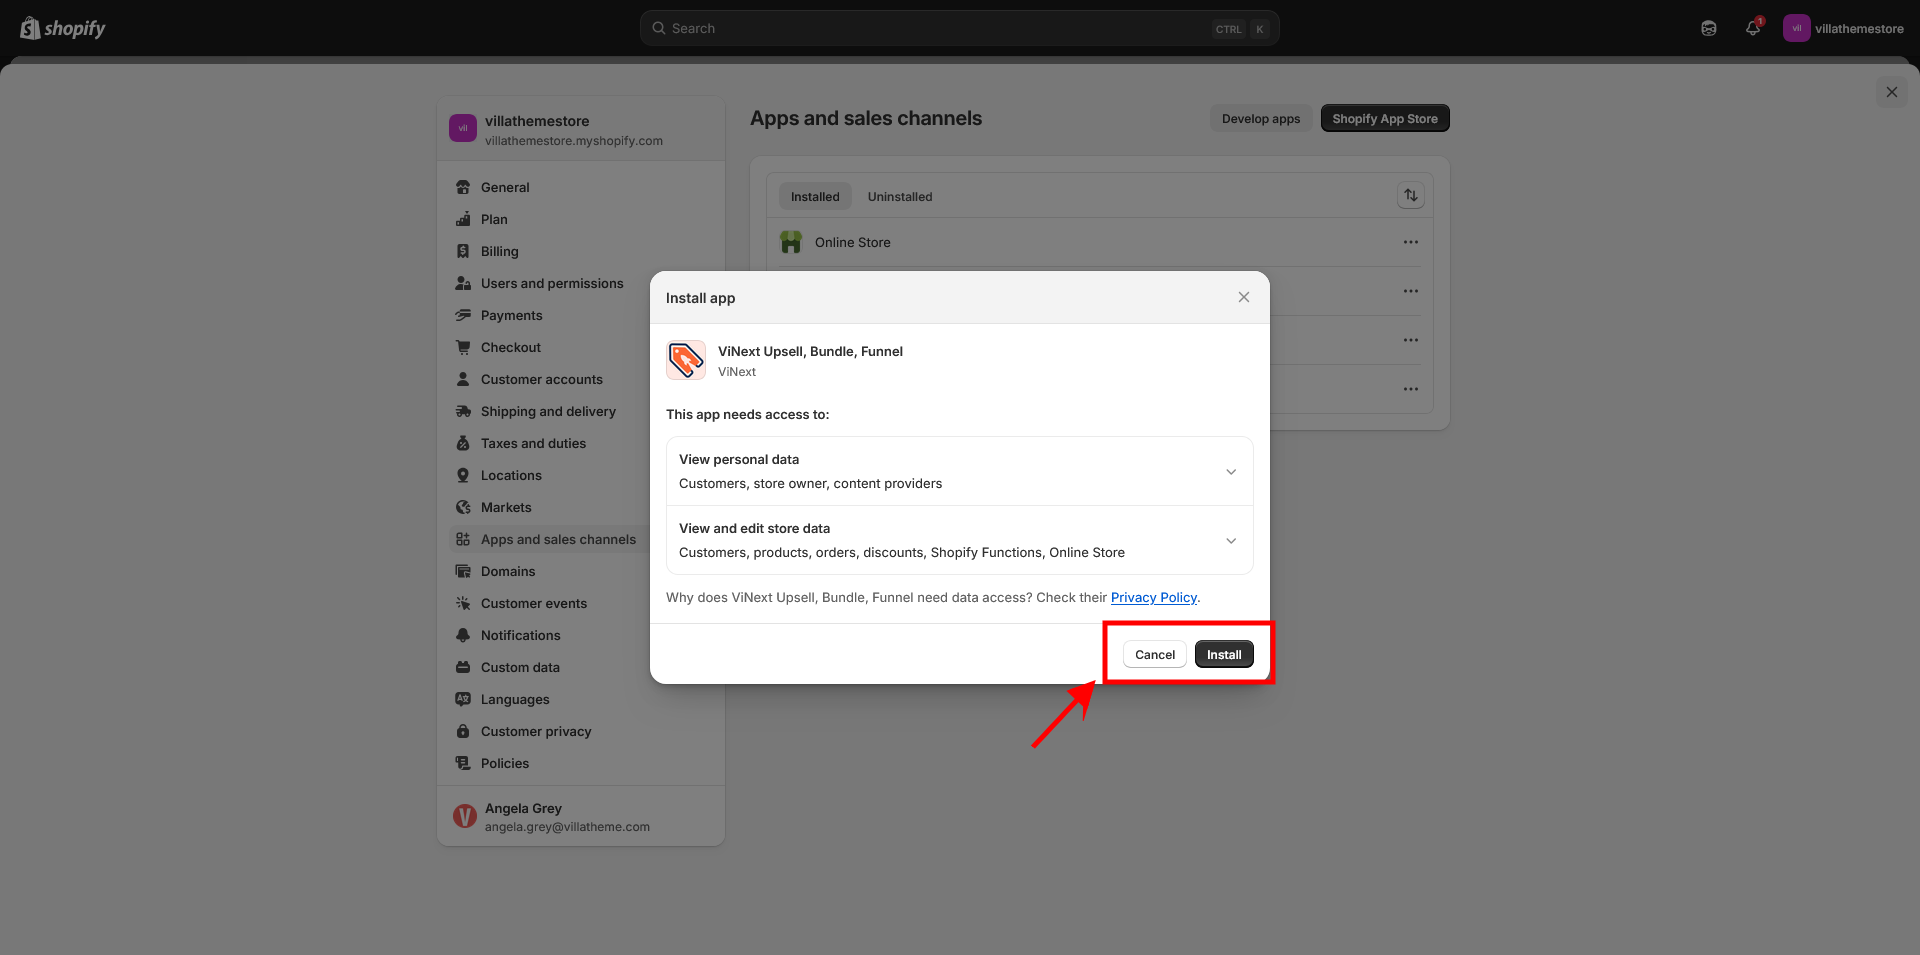
  1. You will be redirected to your Shopify Apps and sales channels >> confirm to install the app here
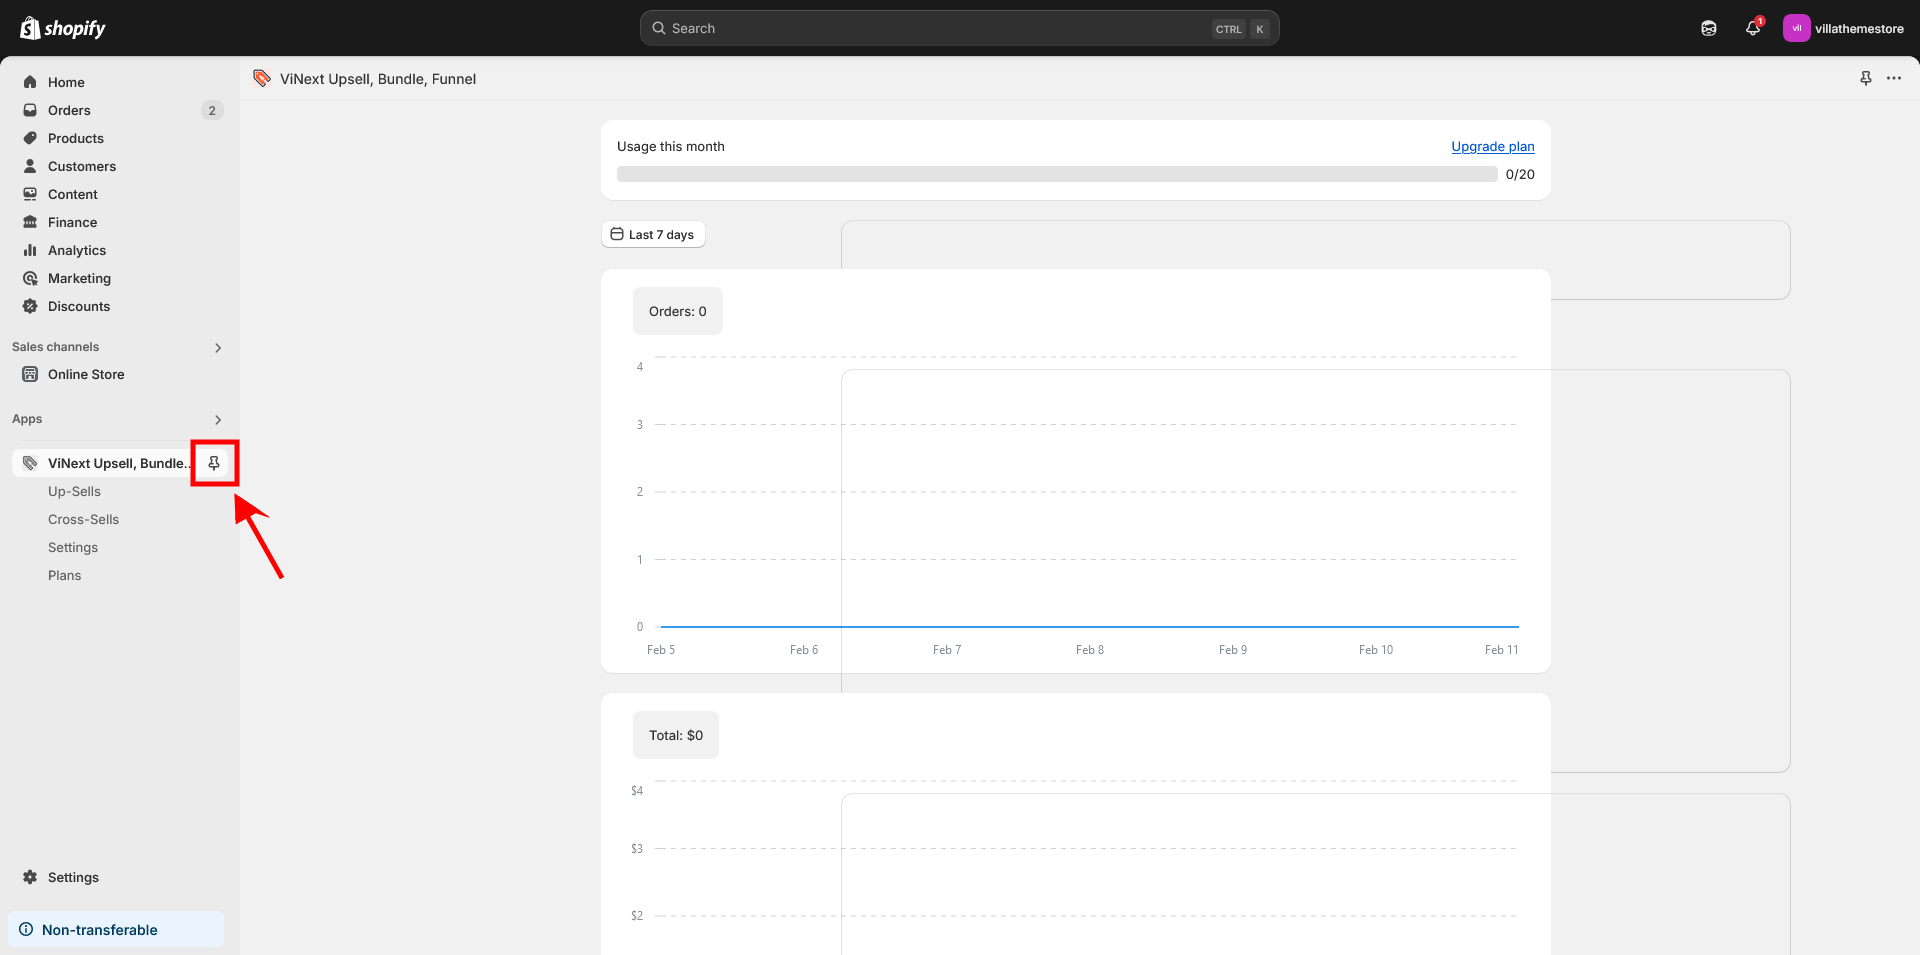
  2. Pin the app easy management. We can learn how to unpin them in the next parts


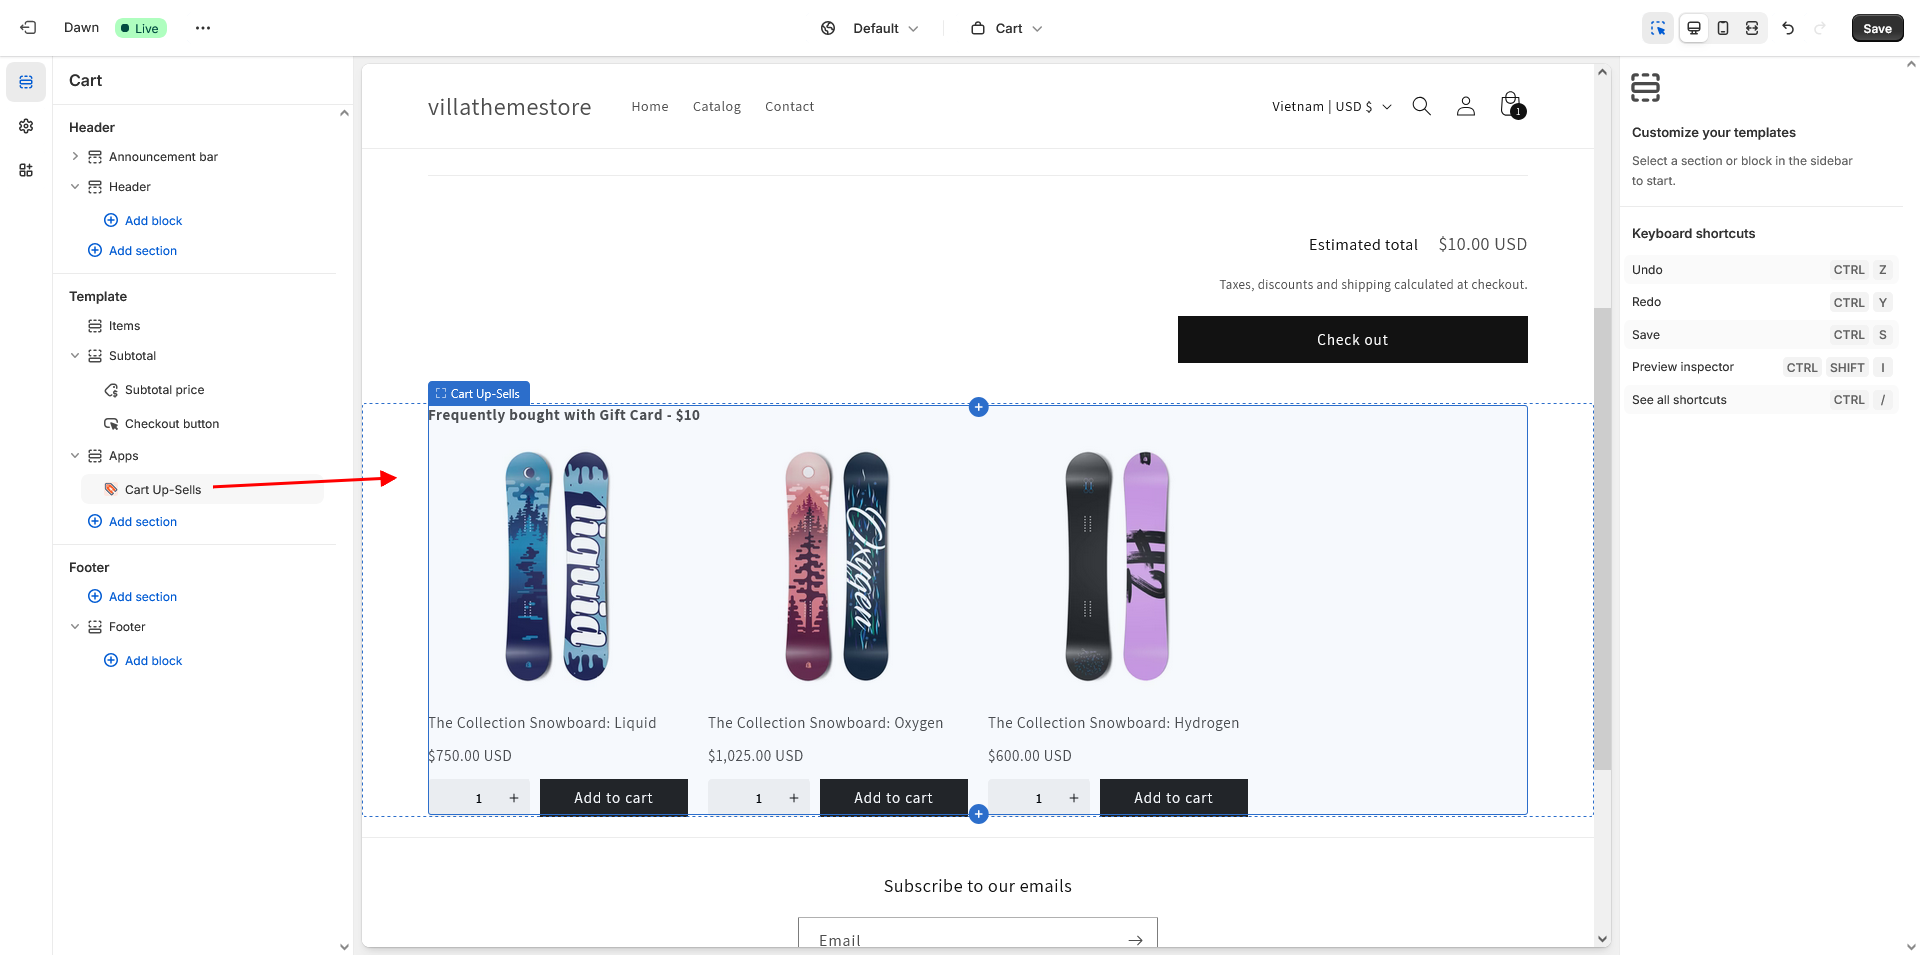
That would be it. After installation, follow the onboarding instructions. Configure the necessary settings as per your store’s needs.


As you may know, upsell and cross-sell are sales techniques used to increase a customer’s purchase value by offering relevant products. If you’re looking for a solution that helps integrating these strategies to your Shopify store, boost revenue and improve the customer experience by offering useful product recommendations, ViNext Upsell, Bundle, Funnel is what you need.

First, let’s take a brief look at some strategies:

  • Upsell: Encourage customers to purchase a higher-value version or upgrade of the product they are buying. For example, suggesting a premium version of the item they’ve added to their cart.
  • Cross-sell: Suggest complementary products to what the customer is already viewing or adding to their cart. This helps increase the value of each sale.
  • Bundles: Combine multiple products into one attractive offer, often at a discount, to encourage customers to buy more at a better price.
  • Funnels: Guide customers through a series of steps, offering them related products or discounts, to maximize the purchase value.

By using these strategies, you can increase average order value, improve customer experience, and drive more sales with minimal effort.

And that’s what you can achieve with ViNext Upsell, Bundle, Funnel

  • Increase your store’s revenue by offering relevant upsells, cross-sells, and bundled products.
  • Improve customer satisfaction by making personalized product recommendations.
  • Boost conversions with a discount bar and post-purchase suggestions that keep customers engaged.
  • Drive more sales with minimal setup, giving your store a powerful marketing edge.


Suggested Products

  • Upsell: After a customer adds a product to their cart, a popup appears showing suggested products either by category or the specific product they’re looking at. This encourages customers to purchase a more valuable item.
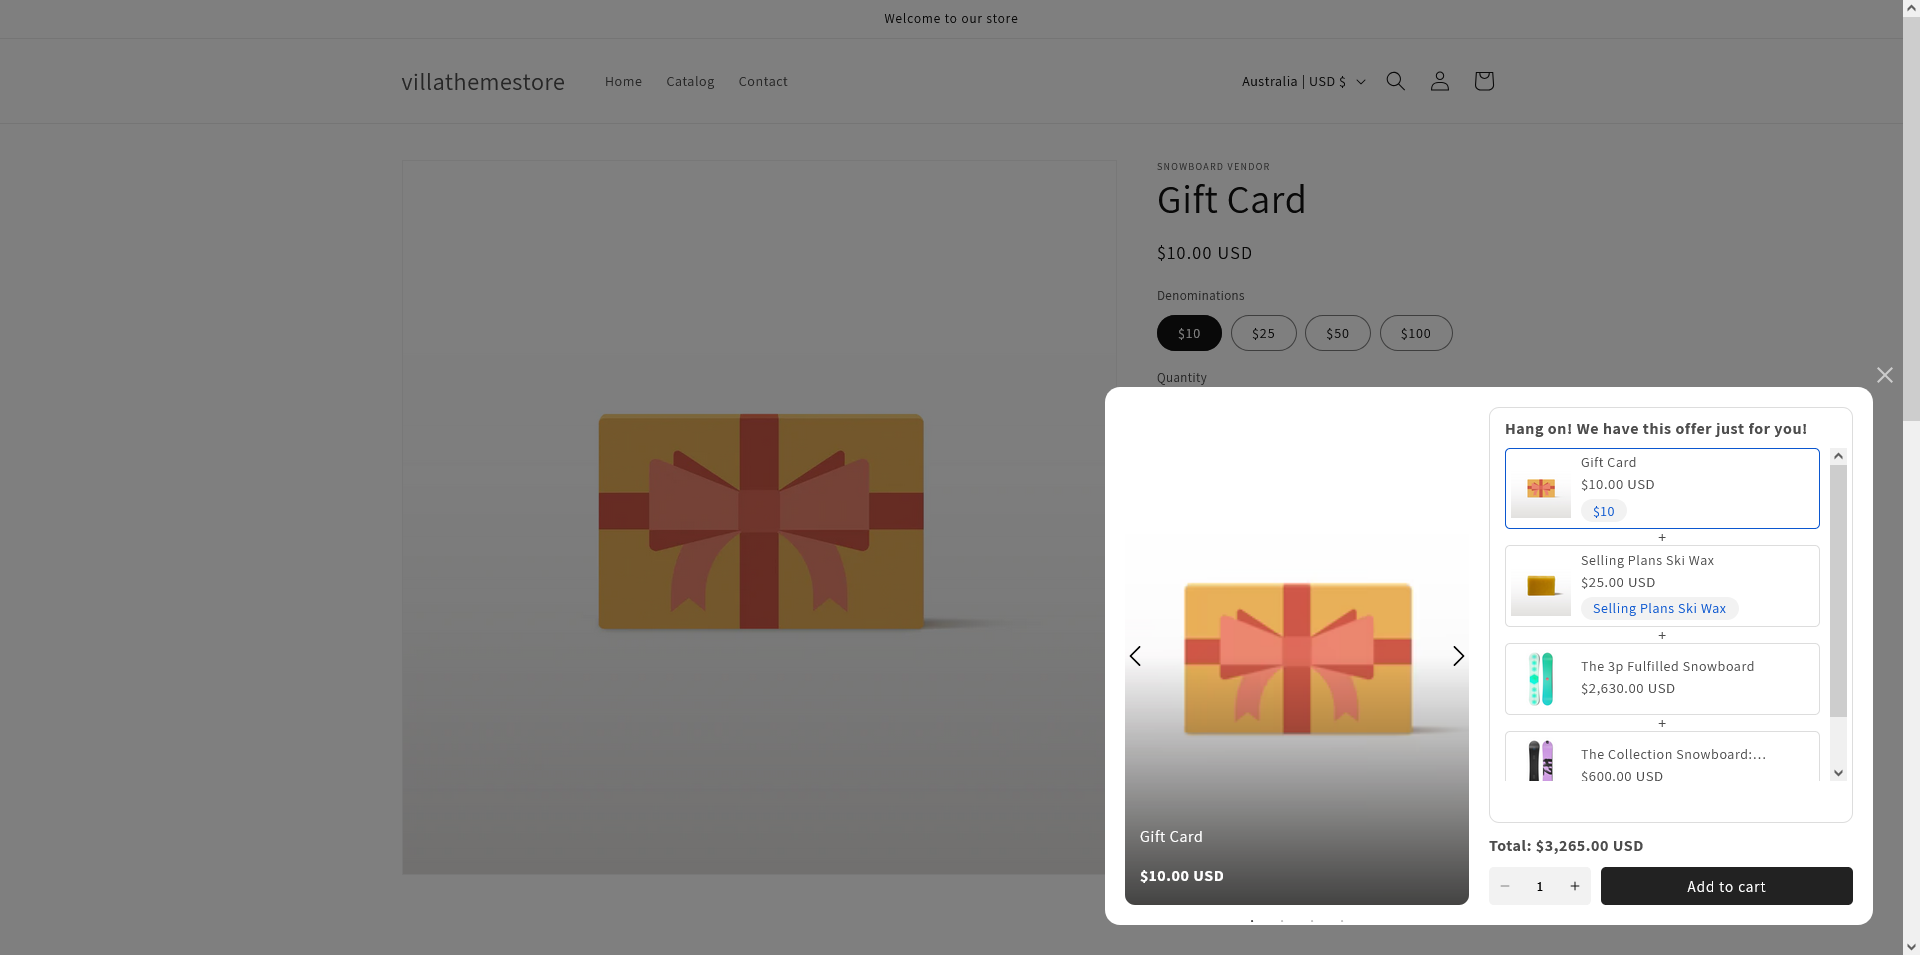
  • Cross-sell: Display a popup triggered by a clickable icon on the single product page. It shows bundles of the current product and other suggested items, offering a better deal or a more attractive combination of products.

Bought Together: Display products that are frequently bought together. This section appears on the single product page, where you can customize the layout using the theme customizer.

Post-Purchase: After customers complete their order, show them additional recommended products based on their upsell preferences. This helps to keep them engaged and increases the likelihood of repeat purchases.

Discount Bar: A prominent popup will show up whenever customers add an item to their cart, offering a discount selected from your Shopify store discounts. It can even auto-redirect customers to the checkout page after the countdown ends.

Message Customization: Tailor the content of your suggested products, discount bar, and upsell/cross-sell messages to match your store’s tone and style.

With ViNext Upsell, Bundle, Funnel, you have all the tools you need to optimize your store for higher sales, increased engagement, and a better overall shopping experience for your customers.

Check out a quick overview of each feature and how to use them.

Upsell (Higher-Value Purchases): Suggests related or upgraded products right after a customer adds an item to the cart.

  • Shows a popup with suggested products.
  • Products can be sourced from manually selected items, recently viewed items, or the same category.
  • Can also be displayed as a section on the cart page.


Cross-Sell (Offer Bundled Products Instead of Single Items): Encourages customers to buy a bundle that includes the main product instead of just purchasing it alone.

  • Displays a popup or a section on the product page with a bundle offer.
  • Can be triggered automatically after a delay or when a customer intends to leave the page.
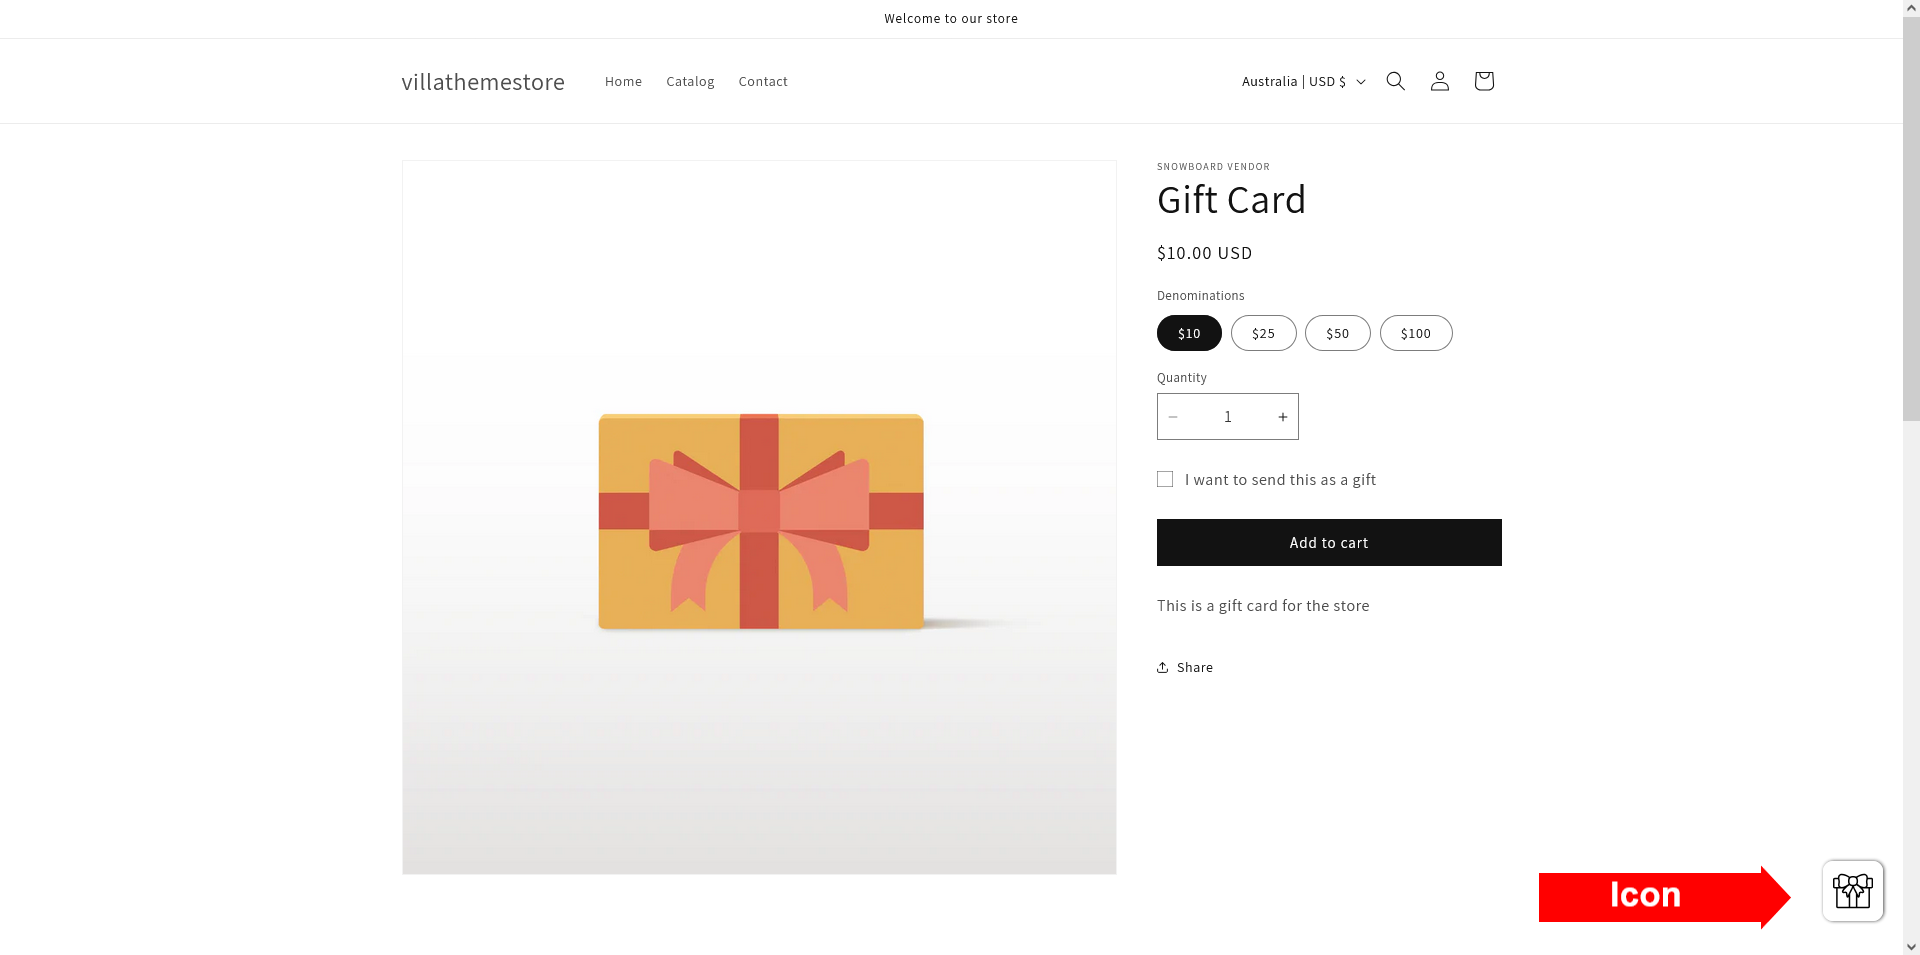
  • A Gift Box Icon can be enabled to let customers manually open the cross-sell popup.


Bought Together (Suggest Frequently Bought Products): Shows a group of frequently bought-together products directly under a product page.

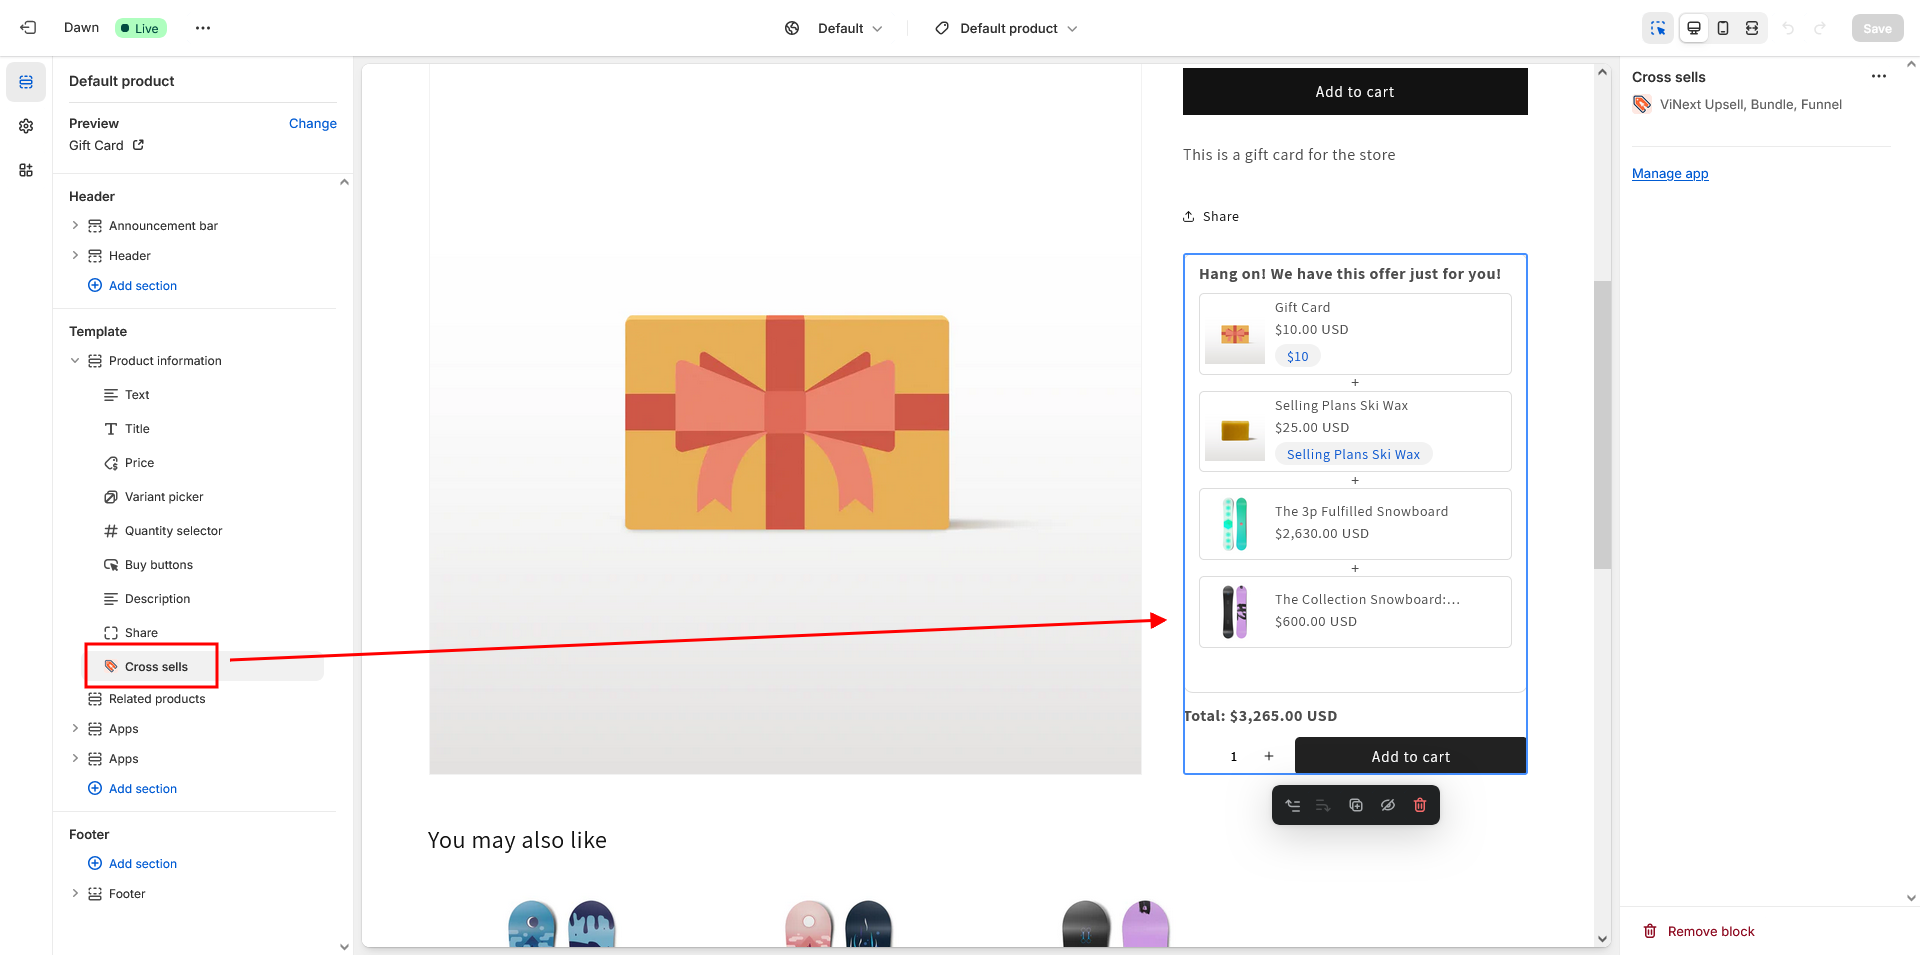
  • The section for these offered as a block is added via theme customizer
  • Suggestions are retrieved from either the current product’s cross-sells, or its upsells.
  • Customers see related products they might want to purchase together. They can add multiple items to the cart with a single click.
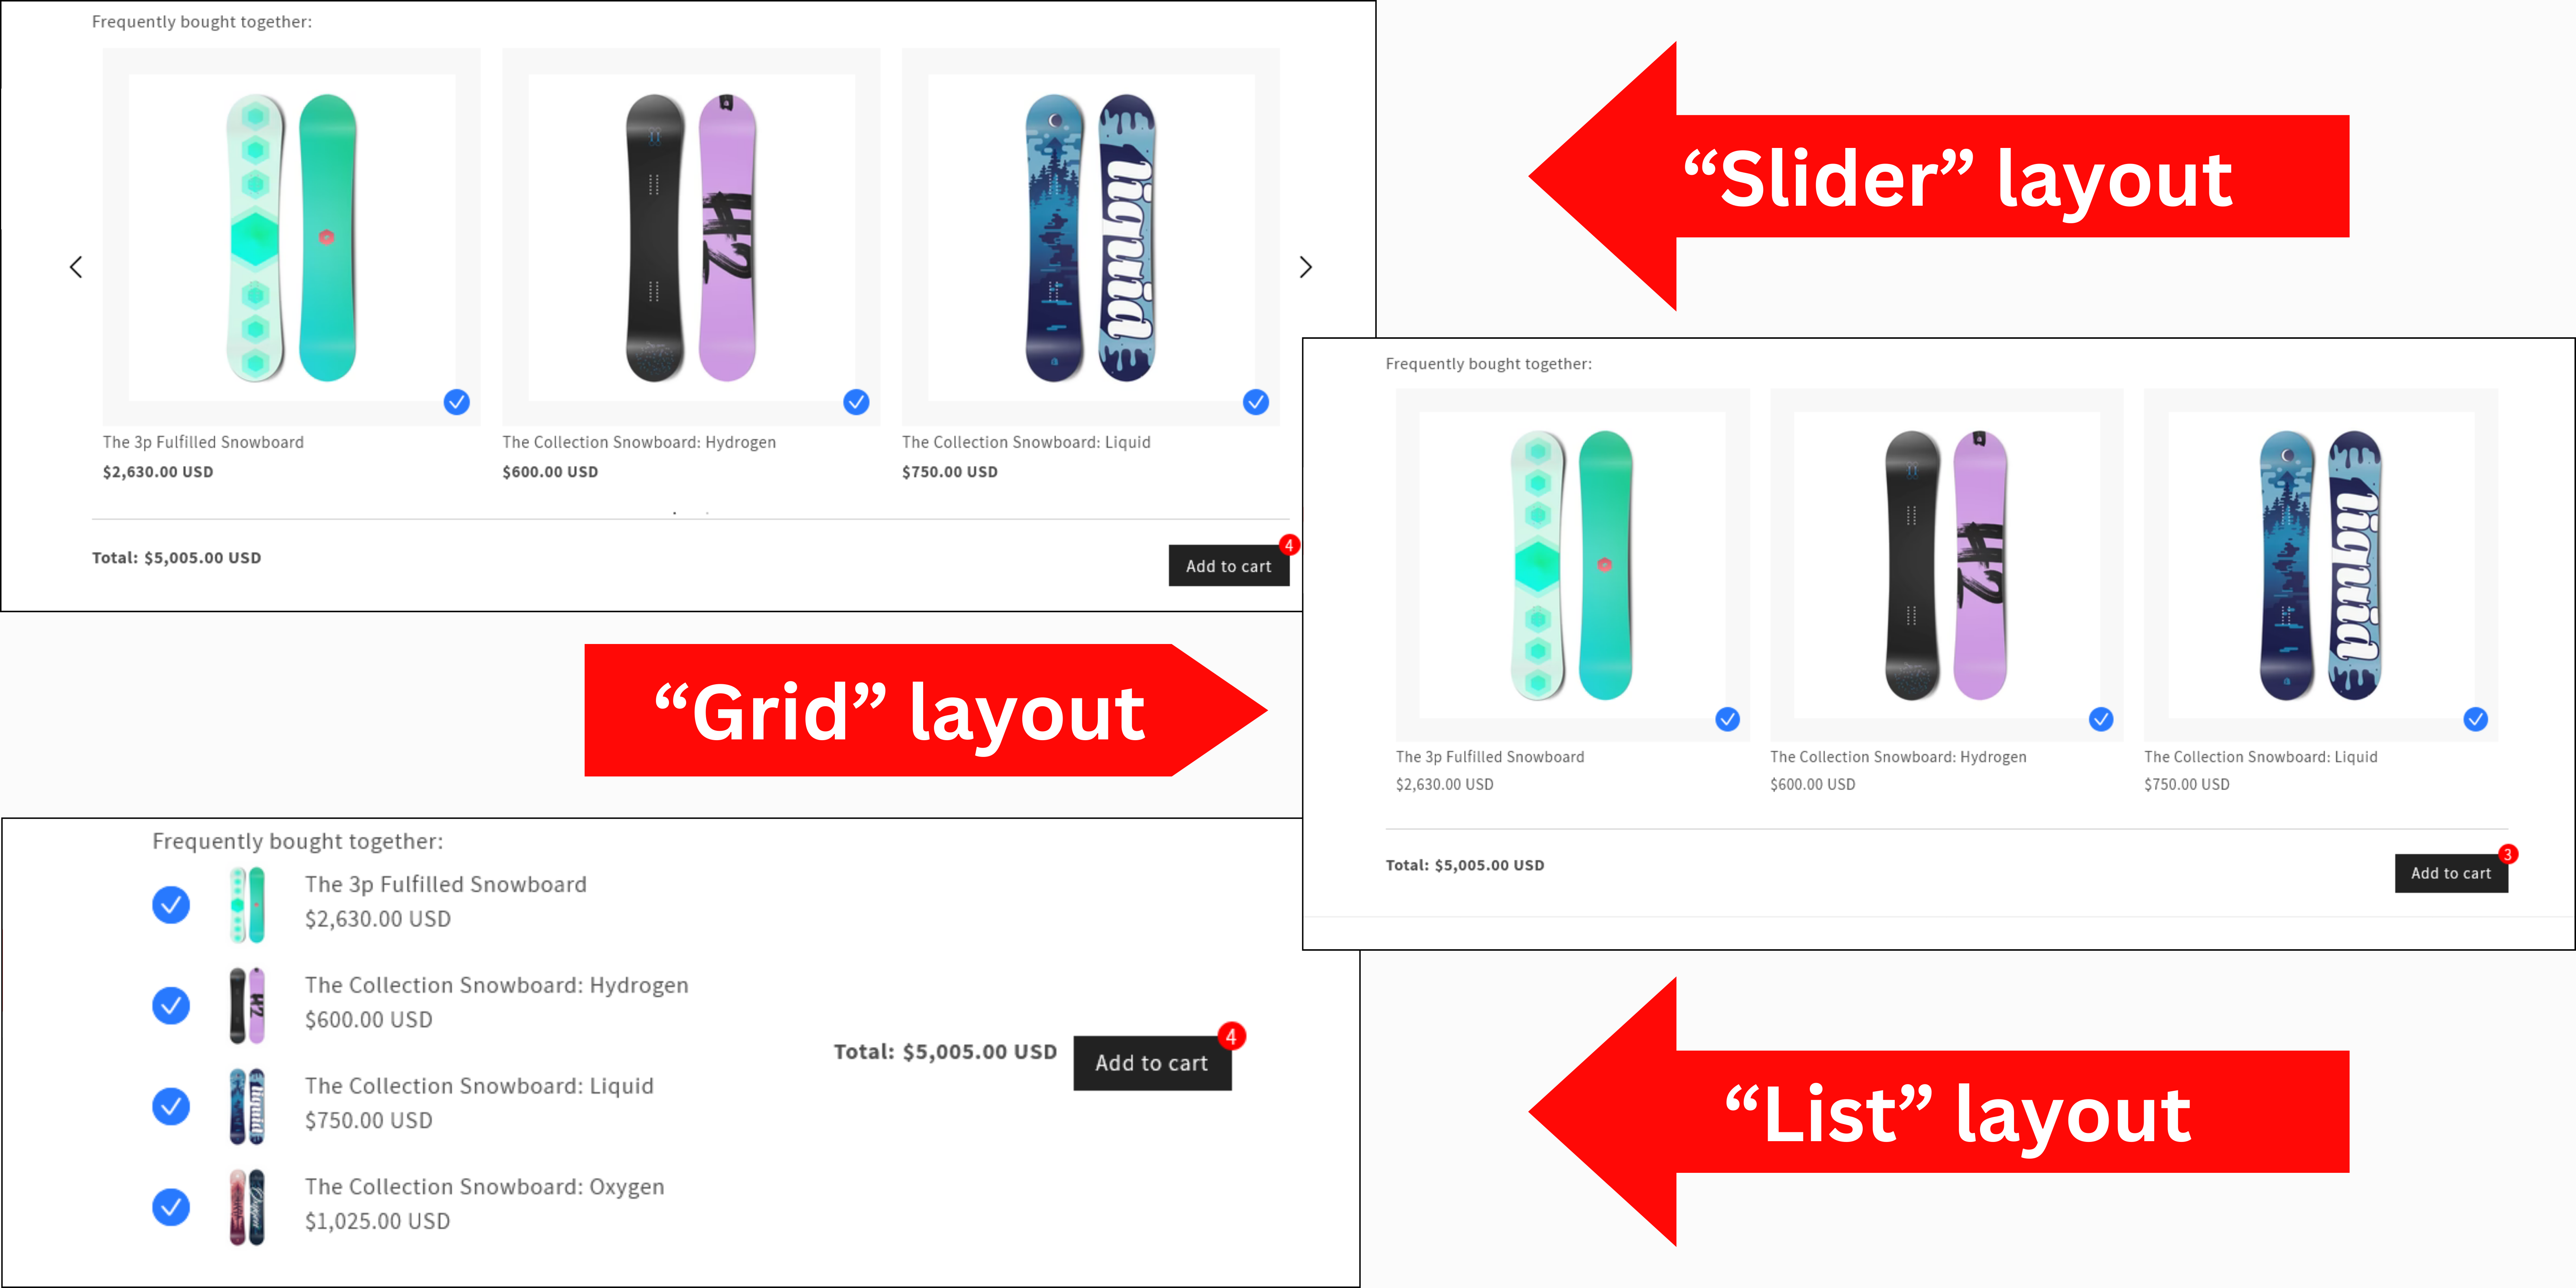
  • Three layouts – List, Grid, and Slider with messages


Post-Purchase (Suggest More Products After Checkout): Displays a special offer right after a customer completes payment.

  • Suggests products from either cross-sell settings or the same collection.
  • Customers can quickly add these products to their order before leaving the checkout page.
  • You can decide whether a discount is applied to the post-purchase suggestion or not
  • Set up a countdown timer


Discount Bar (Encourage Customers to Spend More for a Discount): Shows a progress bar to encourage customers to spend more to unlock a discount.

  • A bar appears when a product is added to the cart, showing the amount needed to reach the discount.
  • Customers see a progress bar indicating the amount left to receive the discount
  • Once qualified, show a popup with congratulation message and a countdown timer which can be automatically redirected to checkout when the discount is applied.
  • Or you can choose whether to always show the bar or only display it when customers add an item.
  • Customize the message, style, and progress bar colors.


Up-Sells

Upsells is a popup shown after a product is added to cart or a section at cart page
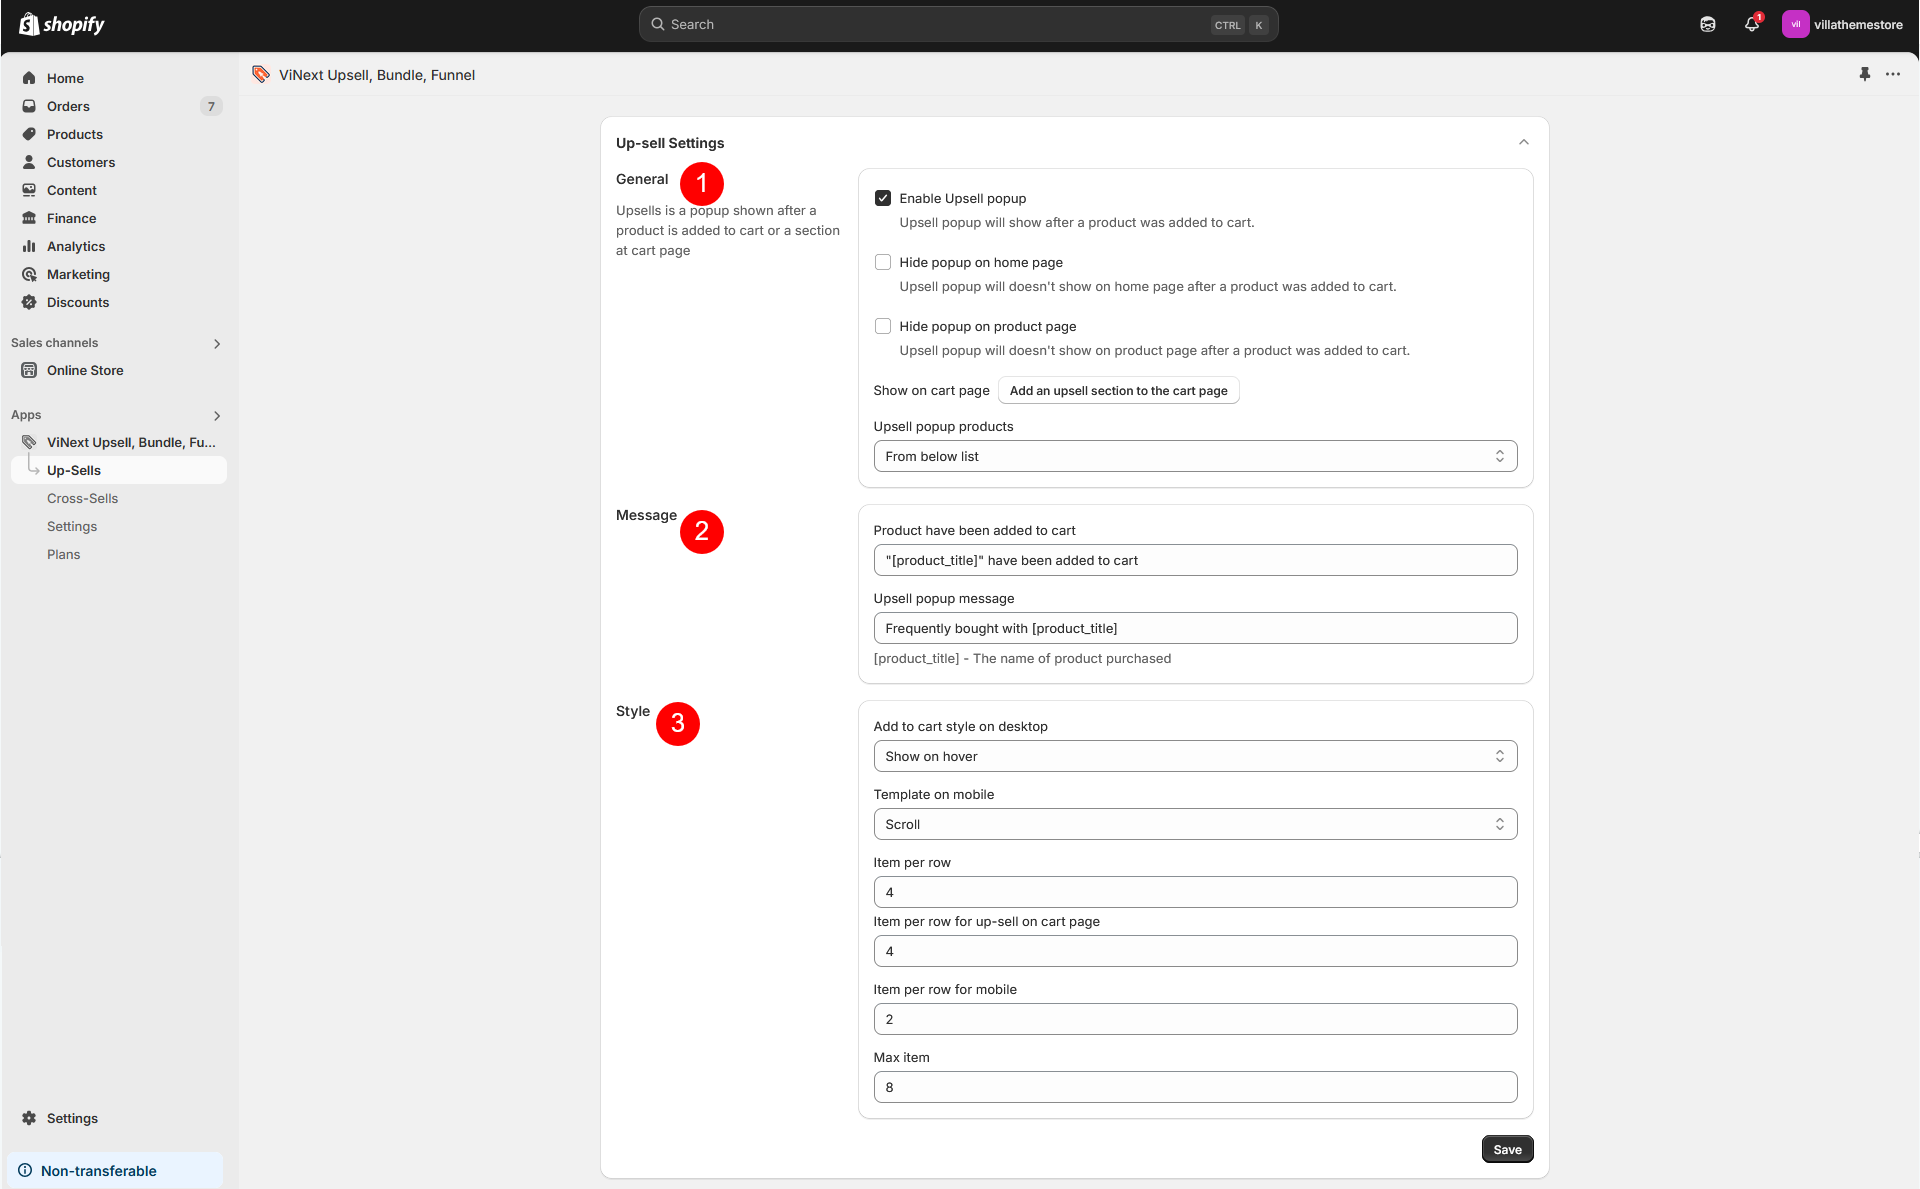
  1. Understand the setting options
  2. How to set up Upsell suggestions
  3. How Upsells appear on the Store


Understanding the Setting Options

  1. General 
    • Enable Upsell popup: Turn on/off the upsell popup that appears after a product is added to the cart
    • Hide popup on home page: Prevent the upsell popup from appearing when a product is added to the cart on the home page.
    • Hide popup on product page: Prevent the upsell popup from appearing when a product is added to the cart on the product page.
    • Show on cart page: Add an upsell section on the cart page via theme customizer
    • Upsell popup products: Choose how the upsell products are selected
      • From below list: Scroll to the section below the settings to manually add upsell suggestions for products in your store
      • Recently viewed: Show products that the customer recently viewed
      • Product in the same category: Suggest products from the same category as the added item
  2. Message: Customize the text content in the upsell popup
    • Product have been added to cart: Edit the message displayed when a product is successfully added to the cart
    • Upsell popup message: Customize the message encouraging customers to add additional recommended products
  3. Style: Customize how the upsell popup looks on different devices
    • Add to cart style on desktop:
      • Show on hover: The Add to Cart button only appears when the customer hovers over the suggested product
      • Visible below product detail: The Add to Cart button is always visible below each upsell product
    • Template on mobile
      • Scroll: Customers can scroll through suggested products
      • Slider: Suggested products appear in a sliding carousel
    • Item per row: Set how many upsell products are displayed per row
    • Item per row for up-sell on cart page: Number of items shown per row on the cart page
    • Item per row for mobile: Number of items shown per row on mobile
    • Max item: The maximum number of upsell products displayed in the popup or cart section


How to set up Upsell suggestions

Follow these steps to add upsell suggestions for a specific product:

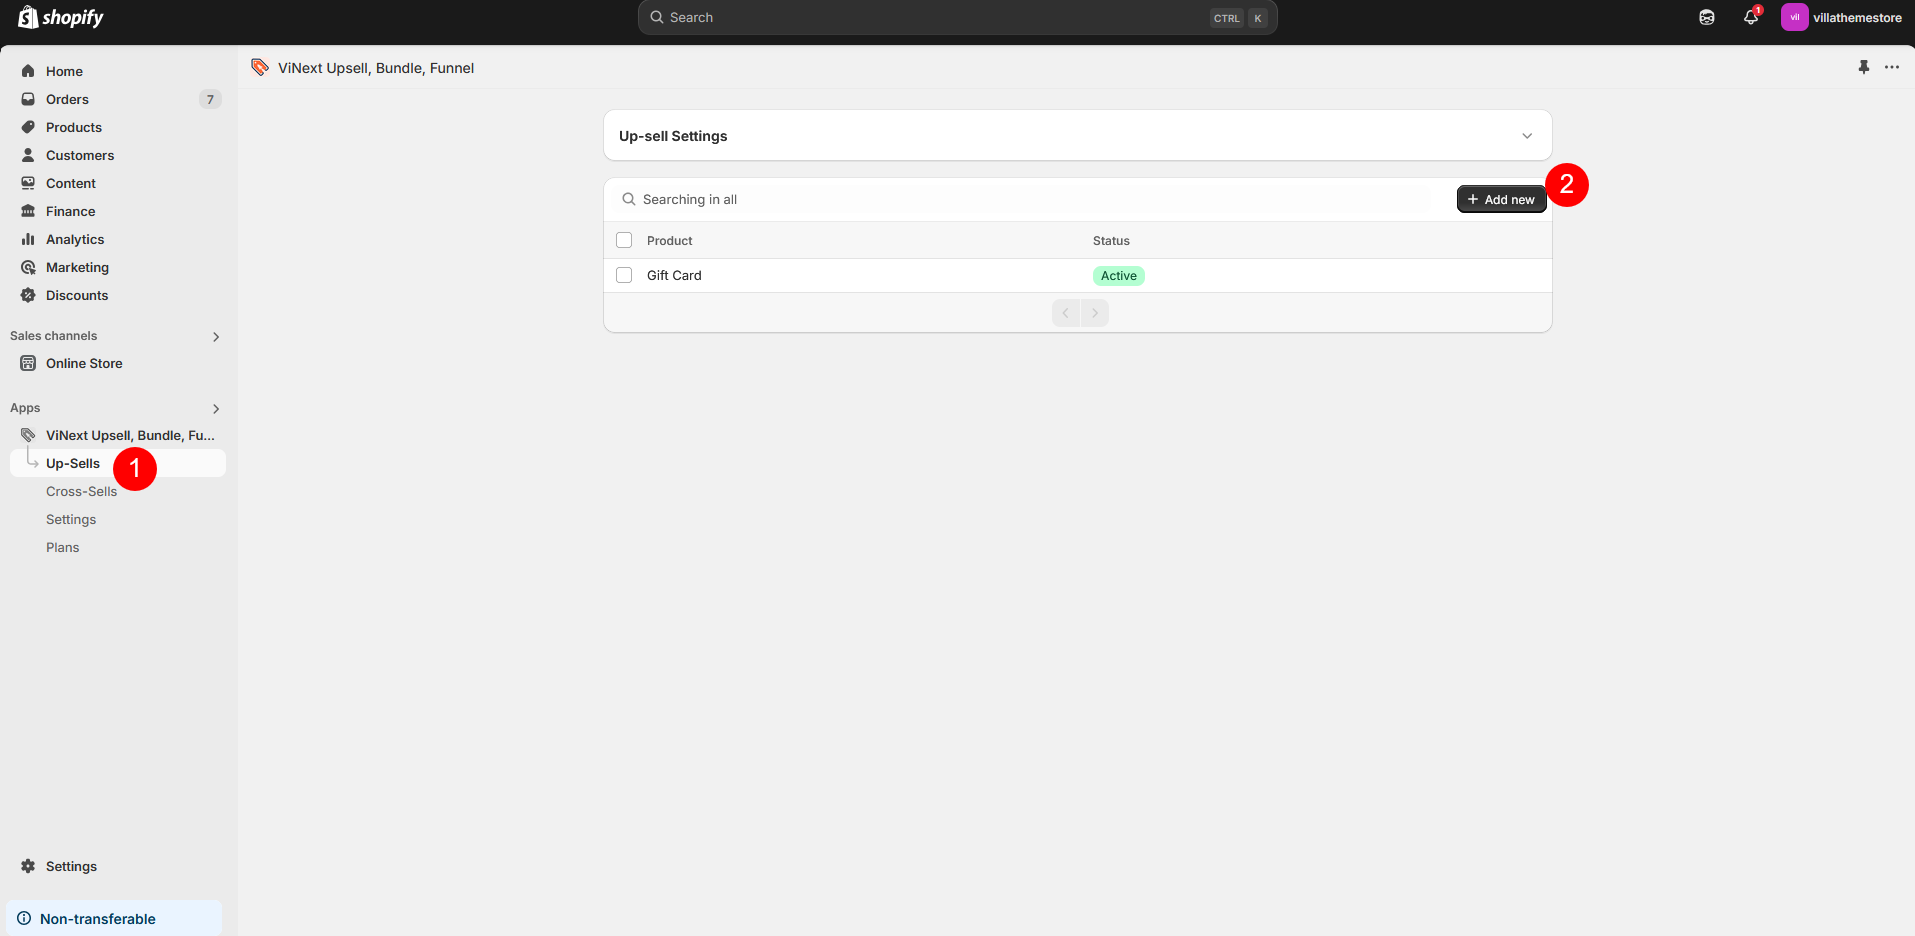
Step 1: Click the “Add New” Button. This will redirect you to the page where you create a new upsell suggestion.
Step 2: On this page
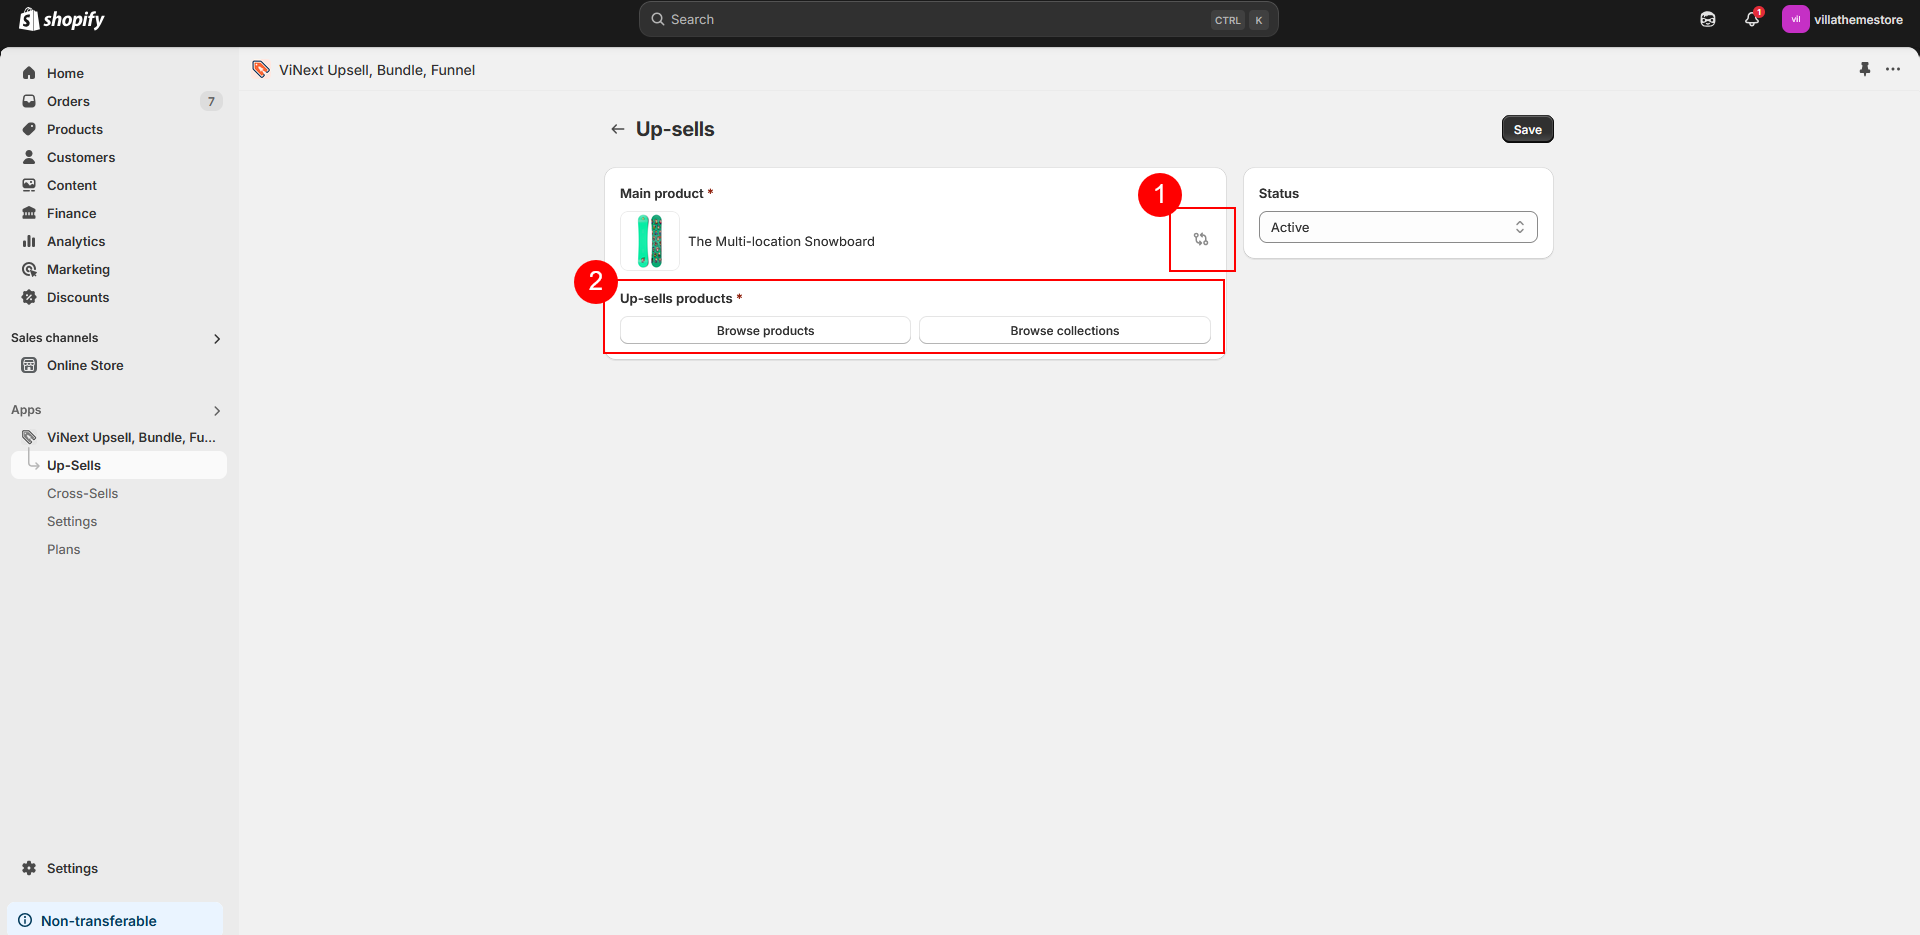
  • Select the Main Product: Browse your Shopify product list and choose the product you want to add an upsell offer to.
  • Choose Upsell Products: Browse your products or collections to find the items you want to suggest as upsell products for the main product.
  • Set the Status
    • Active – The upsell will be shown to customers.
    • Draft – The upsell will be saved but not displayed.

Once everything is set, the upsell suggestions will be applied to the selected product. Your upsell products will now appear based on your settings.


How Upsells appear on the store front end


Add to cart shows on hover


Add to cart button below product details


Cross-Sells

The Cross-Sells feature allows you to suggest bundled products that include the main product
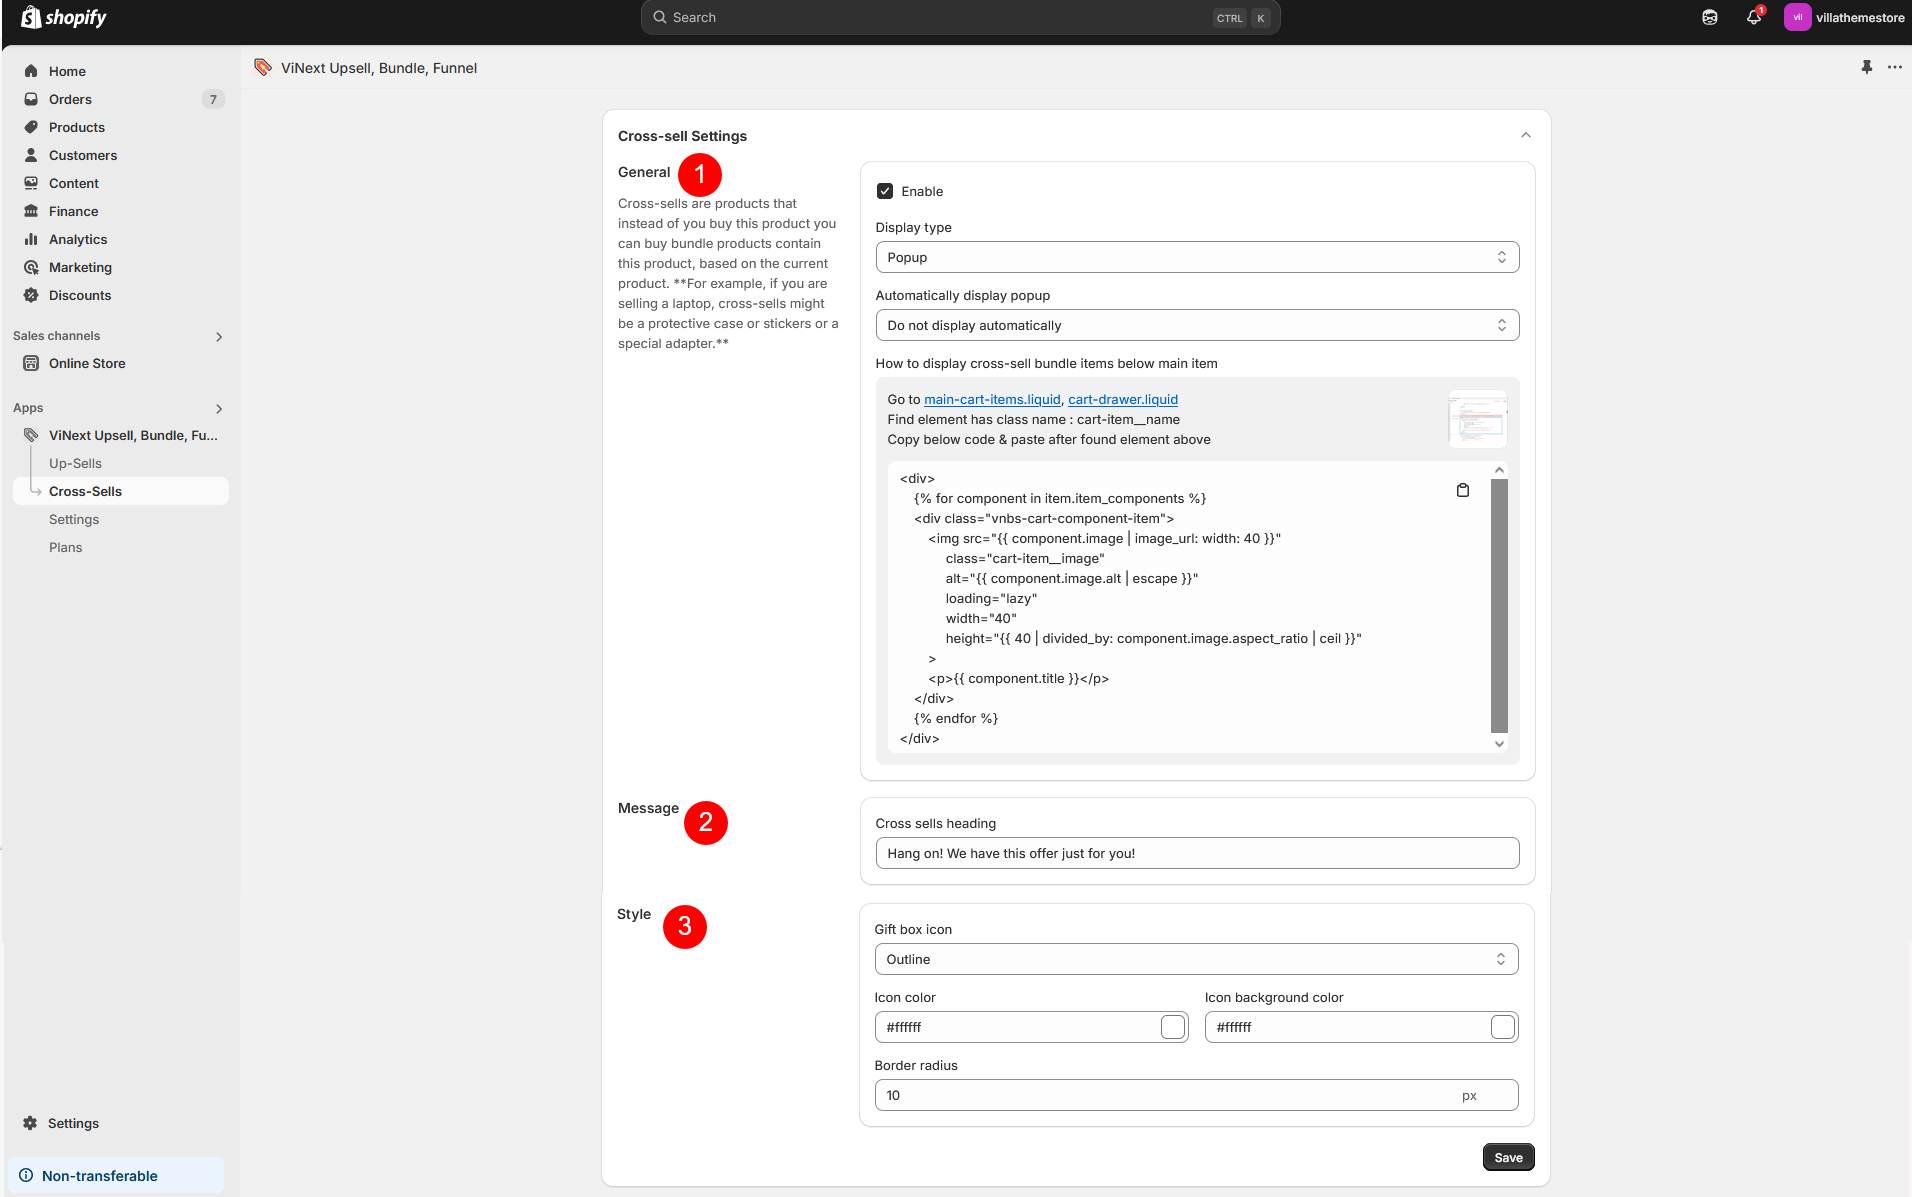
  1. Understand the setting options
  2. How to set up Cross-Sell suggestions
  3. How Cross-Sell appear on the Store


Understand the setting options

  1. General
    • Enable: Turn the Cross-Sell feature on or off
    • Display type: Choose how the cross-sell suggestion appears
      • Popup: Show a popup containing the bundle suggestion
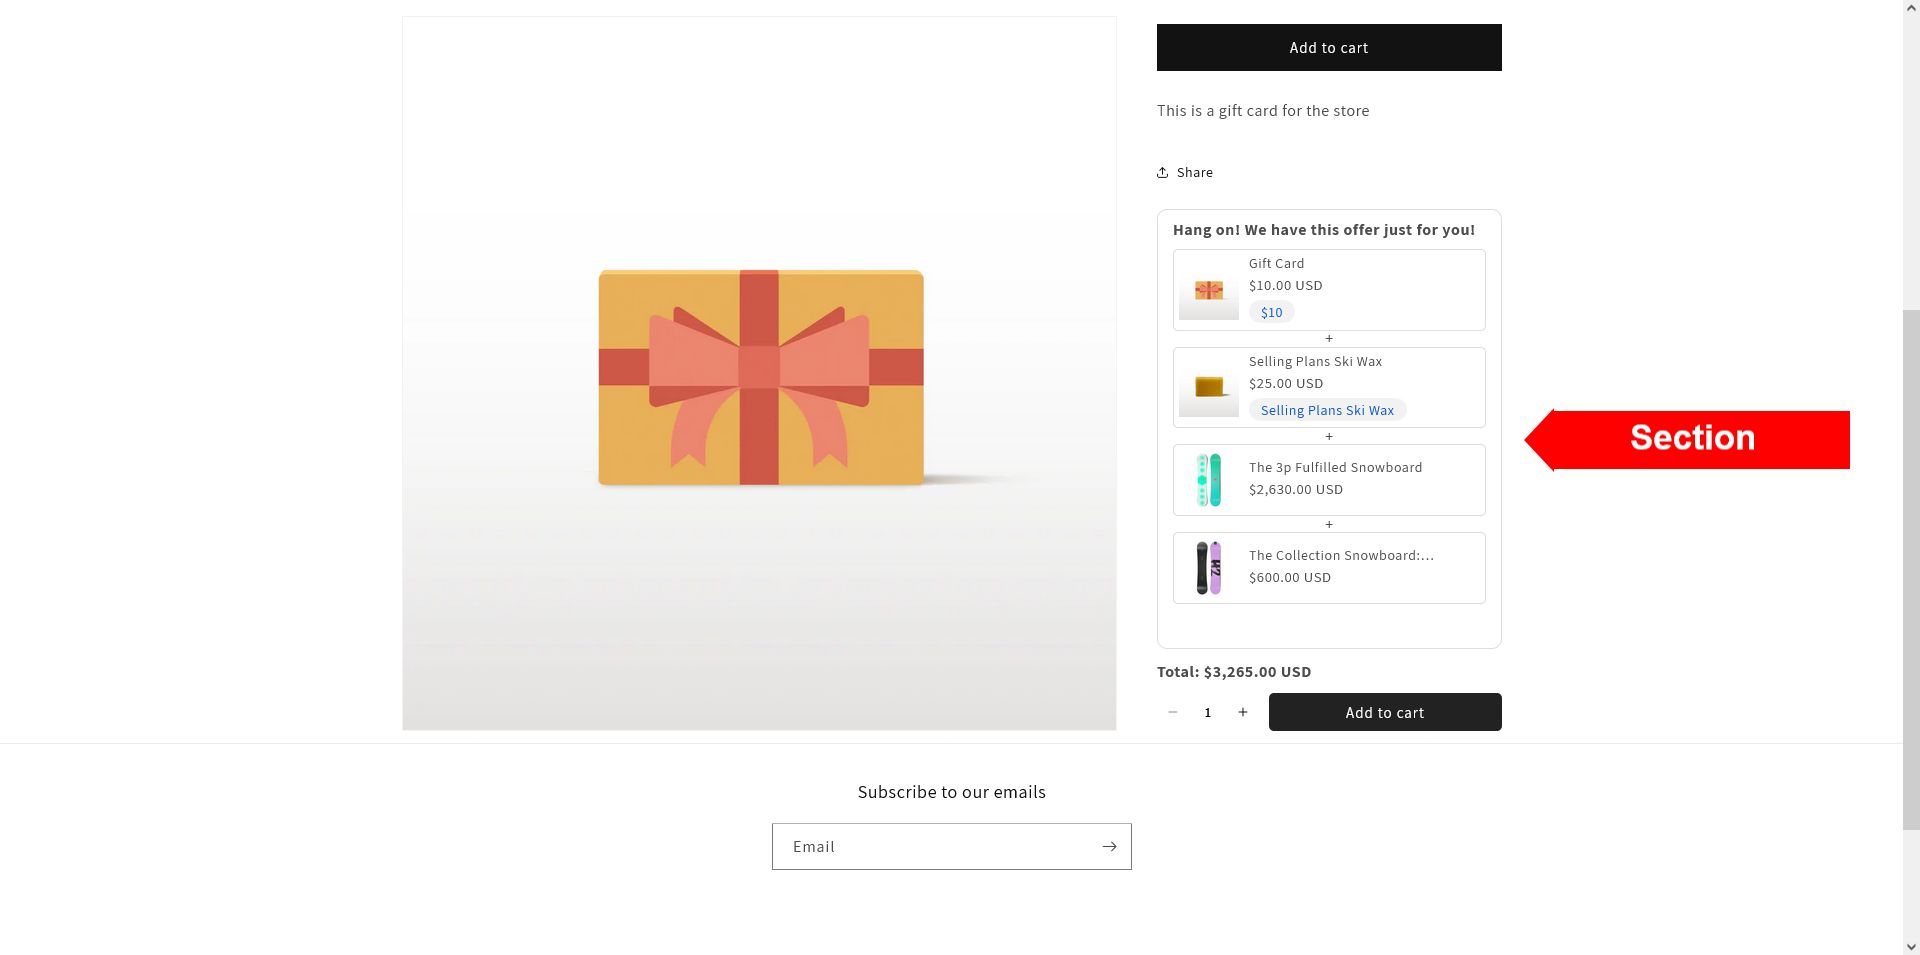
      • Section: Add the cross-sell bundle as a section on the product page (requires adding a block via the theme customizer)
    • Automatically display popup (Only available if Popup is selected as the display type.): Choose when the popup should appear
      • Do not display automatically
      • Automatically display after a delay period: Show the popup after a certain time delay
        • Delay period: Set the time delay before the popup appears. Enter two numbers separated by a comma (e.g., 3,20), the delay time will be randomly chosen between 3 to 20 seconds.
      • Automatically display when the user intends to leave the current page: Detect when a user is about to leave the product page and triggers the popup
  2. Message:
    • Cross sells heading: Customize the heading text that appears above the suggested bundle
  3. Style:
    • Gift box icon: Choose the appearance of the cross-sell trigger icon
      • Outline
      • Solid
    • Icon color: Customize the color of the gift box icon
    • Icon background color: Set the background color of the icon
    • Border radius: Adjust the roundness of the icon’s edges


How to Add Cross-Sell Products

To set up cross-sell bundles, follow these steps:

Step 1: Go to the Cross-Sell page in the app >> Click “Add New”
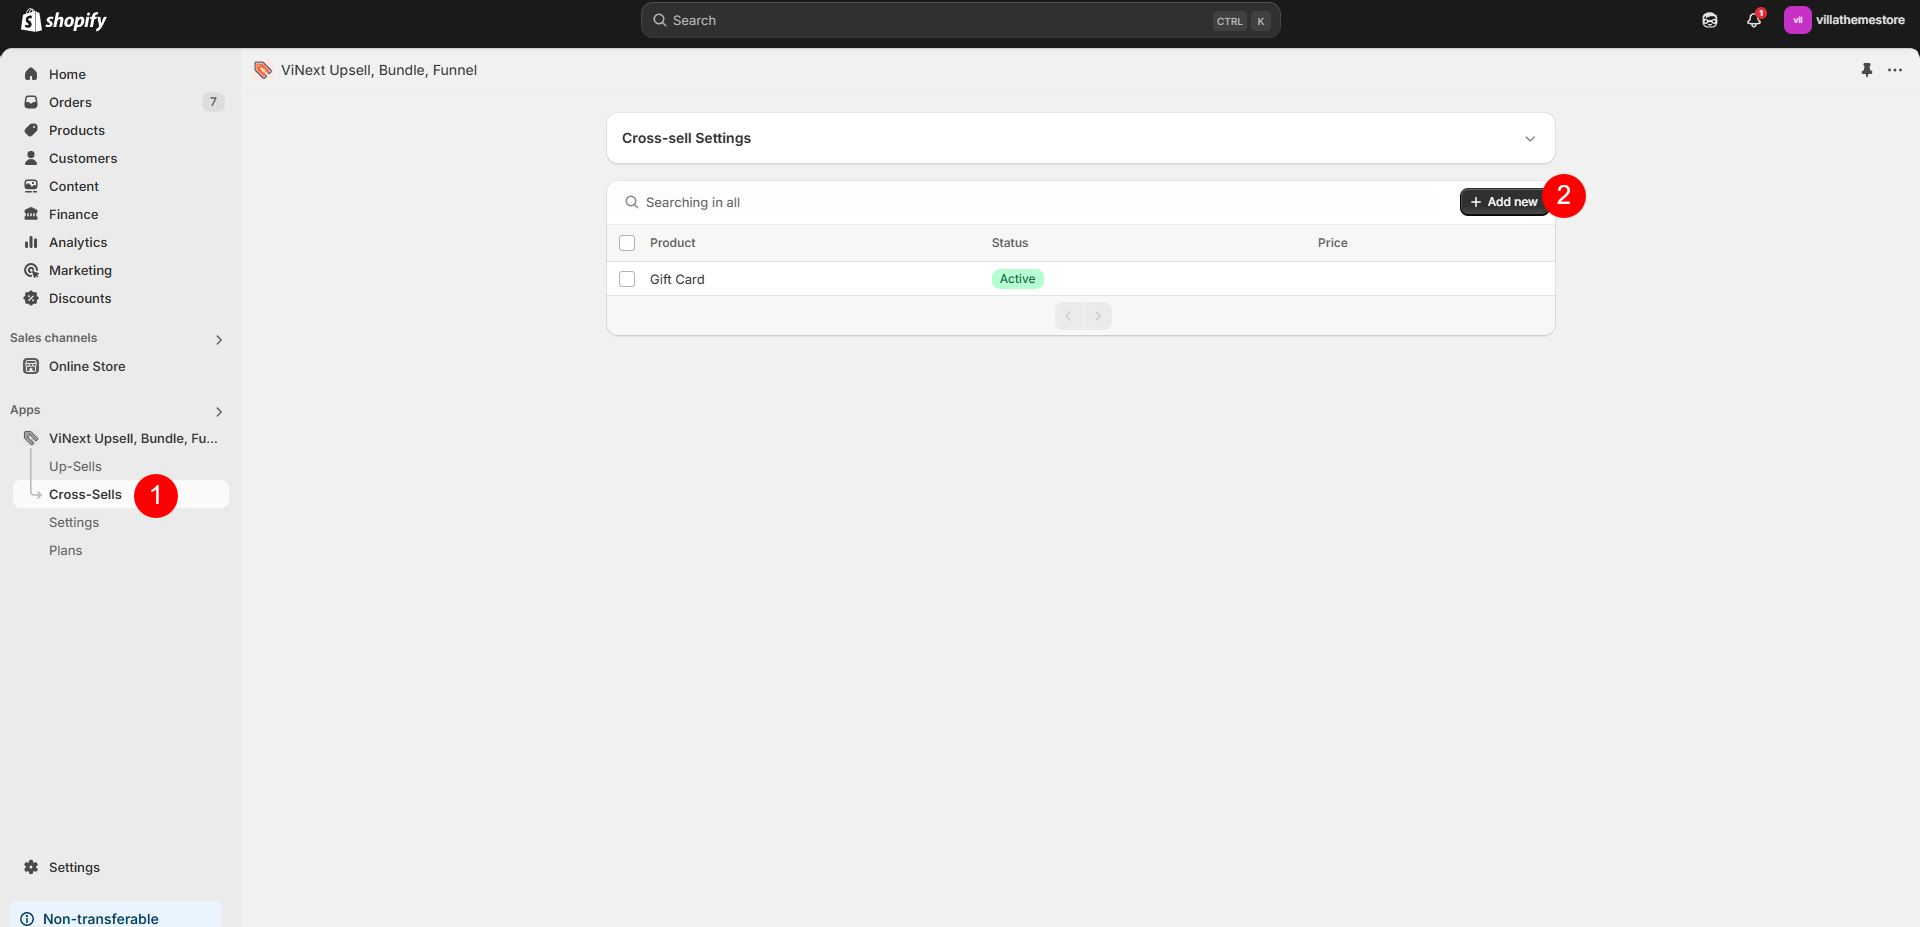
Step 2: This will open a product selection window.
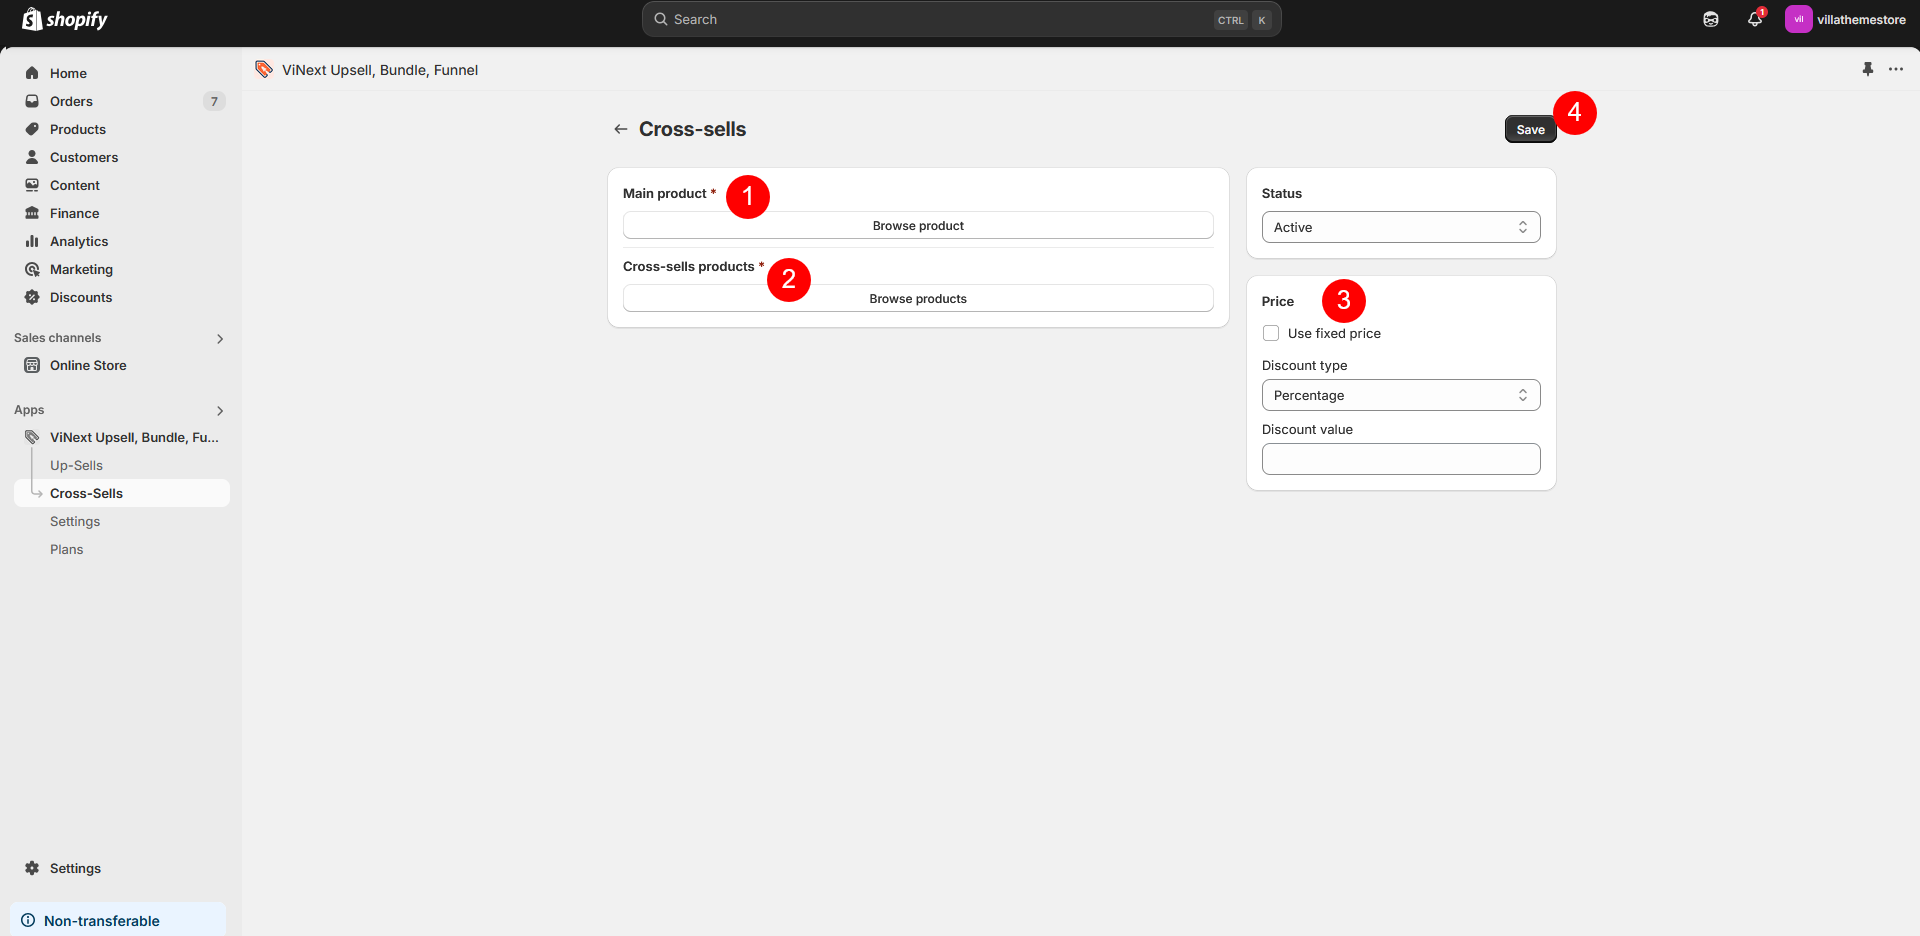
  1. Browse and Select a Product – Choose the main product for which you want to create a cross-sell bundle.
  2. Add Suggested Bundle Items – After selecting the main product, browse and select additional products to bundle with it.
  3. Set up Price for the offer
    • Use fixed price: Check this checbox to make a fixed price for the whole bundle. Once you check the “Use fixed price” checkbox, specify the bundle price in the “Price value” input field
    • Discount type – Fixed: Specify the discount amount in fixed value inside the Discount value input field right below
    • Discount type – Percentage: Do the same as Fixed but in percentage – Specify the discount amount inside the Discount value input field right below
  4. Save the Cross-Sell Setup – Once configured, the cross-sell bundle will be displayed according to your settings (popup or product page section)


How Cross-Sells appear on the Store


Settings – Bought together

The Bought Together settings page allows you to display a group of suggested products on the product page. These products are based on your upsell or cross-sell settings and help encourage customers to add more items to their cart.
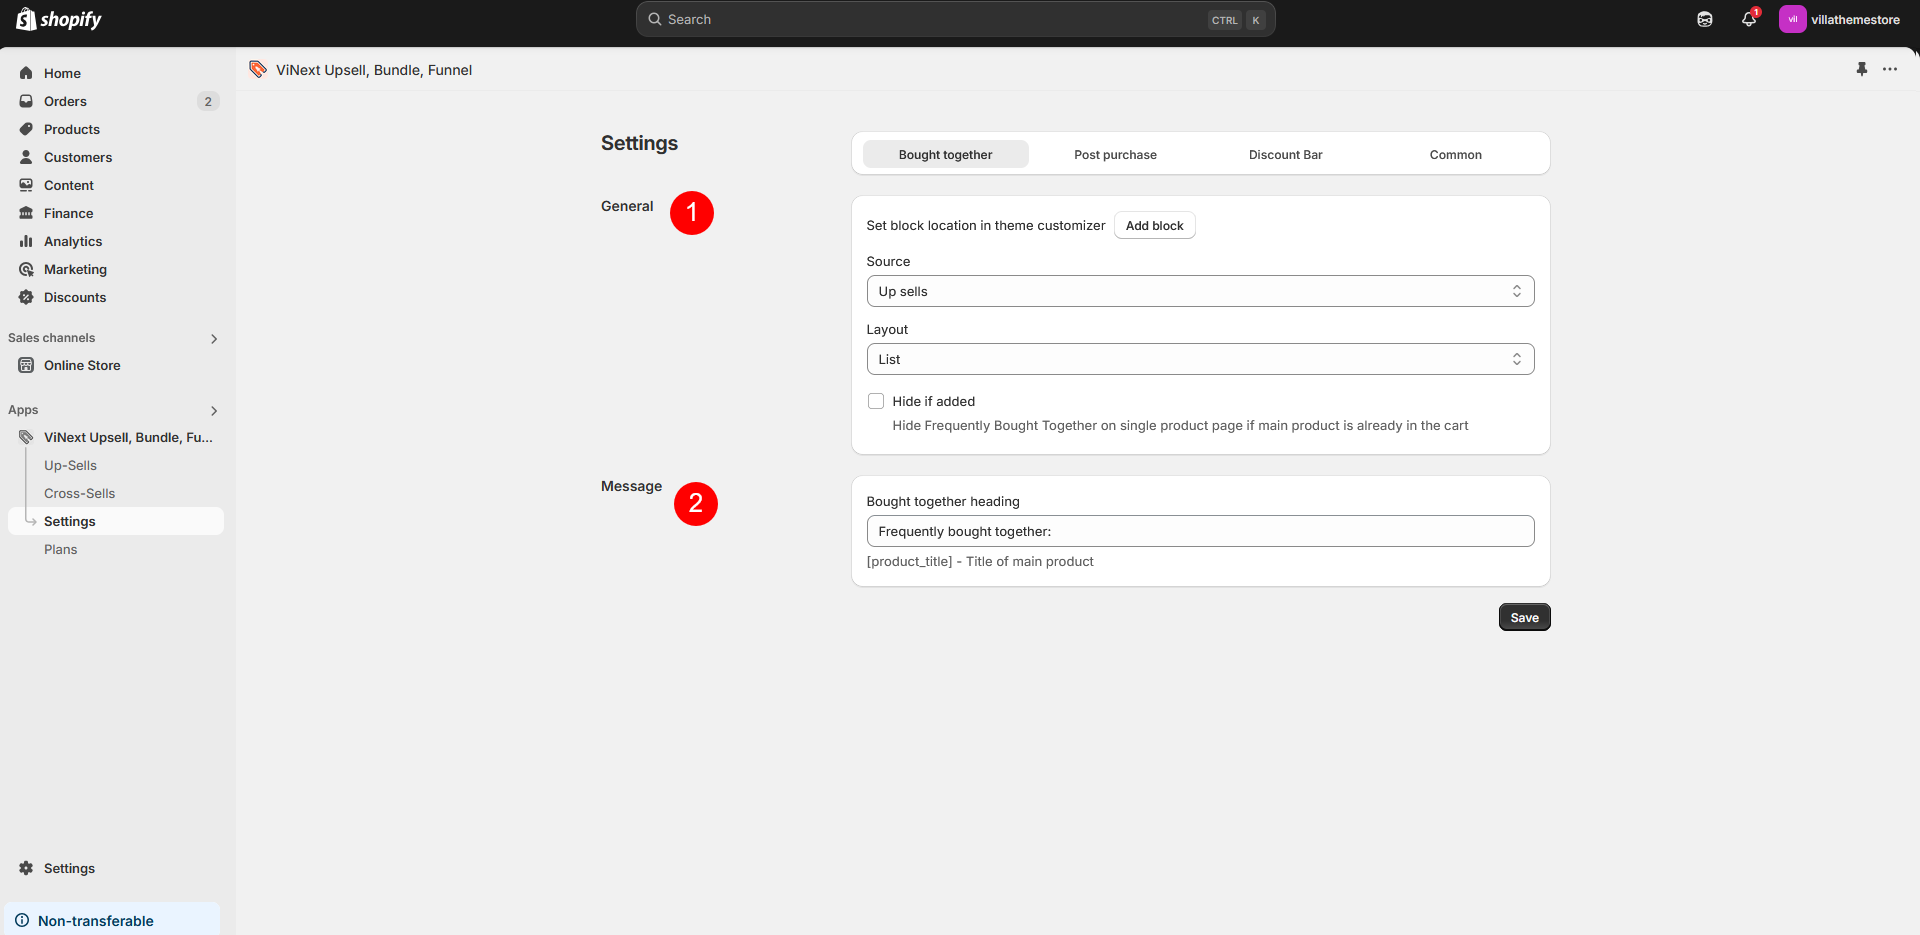
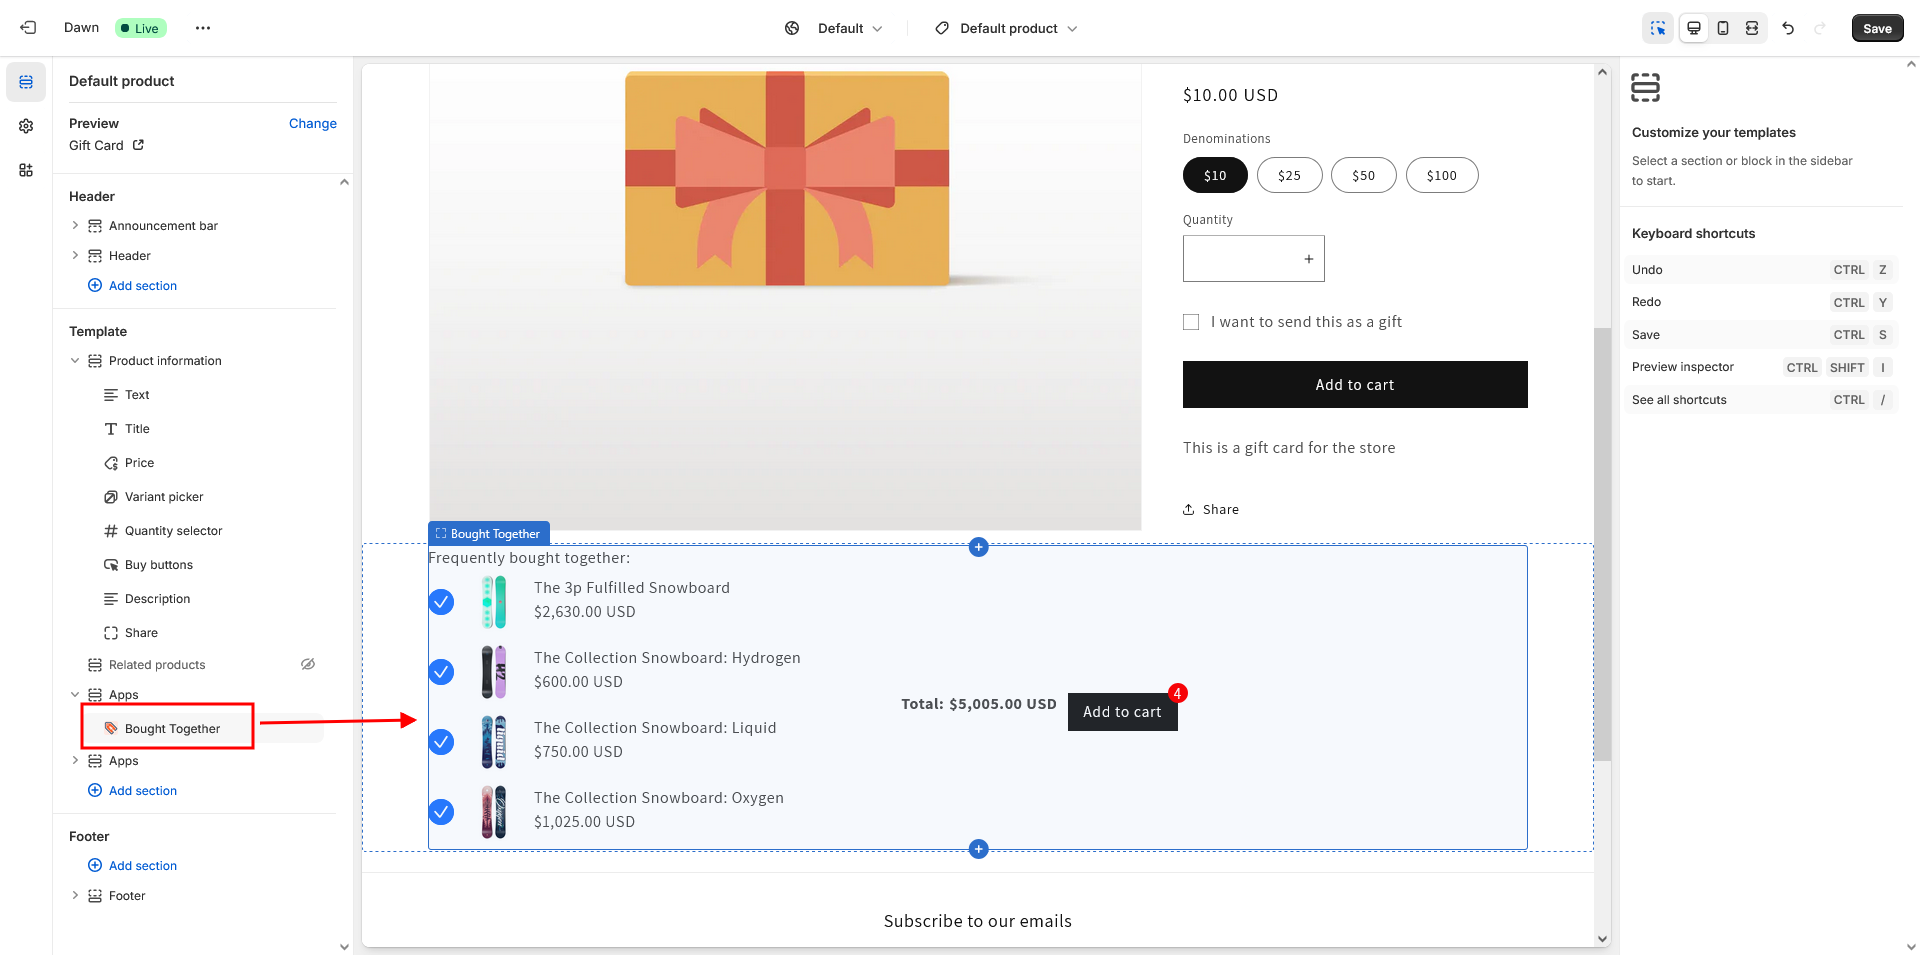
  1. General
    • Set block location in theme customizer: You can place the “Frequently Bought Together” section inside the product page using the theme customizer
    • Source: Choose where the suggested products come from:
      • Upsell: Show products based on your upsell settings.
      • Cross-sell: Show products based on your cross-sell settings.
      • Any of them: Display products from either upsell or cross-sell, depending on availability.
    • Layout: Choose how the suggested products are displayed:
      • List: Show products in a vertical list.
      • Grid: Display products in a grid format.
      • Slider: Show products in a horizontal scrolling slider.
    • Hide if added: Check this box to automatically hide the “Frequently Bought Together” section if the main product is already in the customer’s cart
  2. Message: Edit the heading text for the “Frequently Bought Together” section as you need


After setting up, you will see the frequently bought suggestions on product page. Examples for 3 layouts as follows:


Settings – Post purchase

The Post Purchase feature displays suggested products to customers after they complete their order payment (order is placed), using cross-sell items or products from the same collection. These suggestions help increase the likelihood of repeat purchases by offering suggestions.
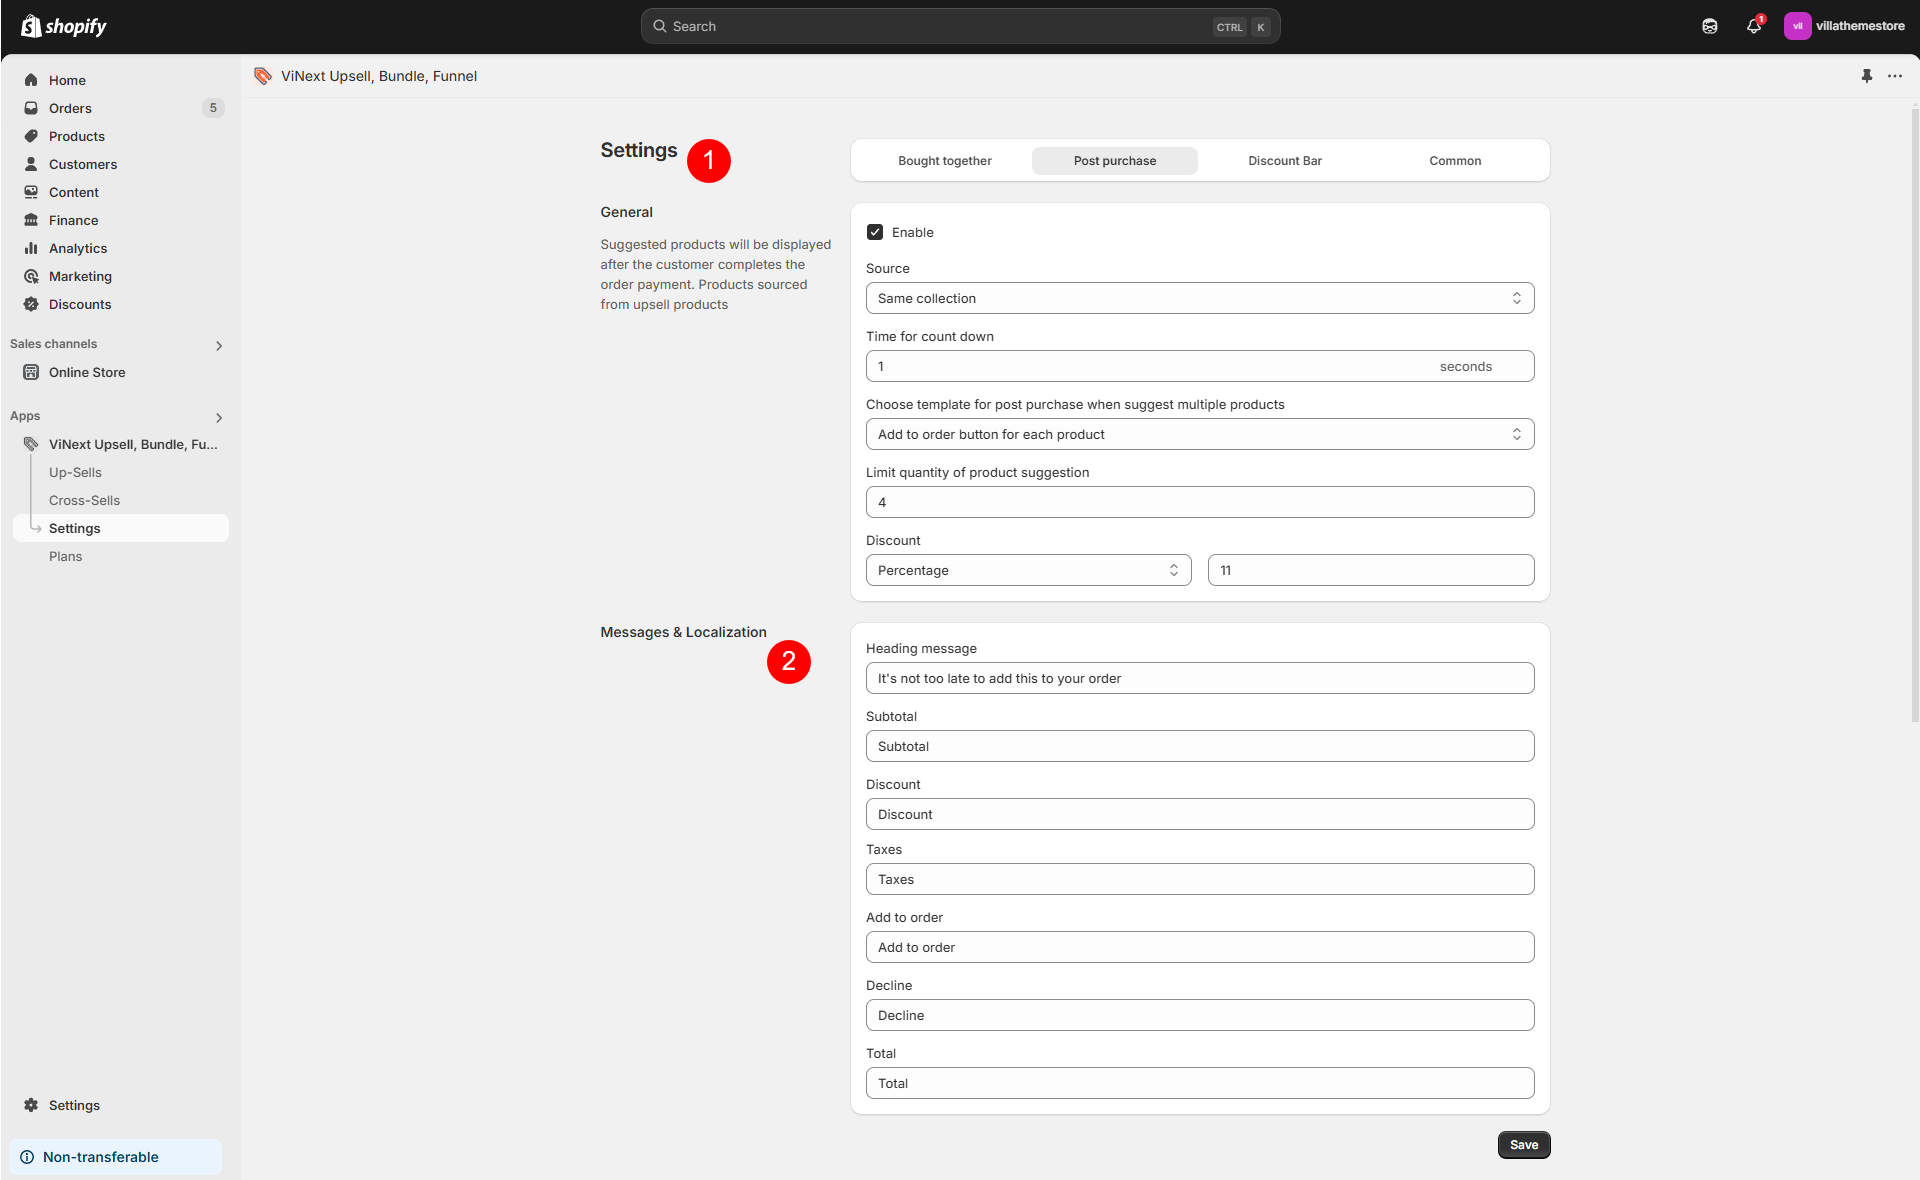
  1. Understand the setting options
  2. Requirement to show Post Purchase
  3. How Post Purchase appears on store

Setting options

  1. General
    • Enable: Turn this Post purchase feature on or off
    • Source: Choose the source of the suggested products
      • Cross-sell – Show products based on your cross-sell settings
      • Show products from the same collection as the one the customer just purchased
    • Time for count down: Set the countdown timer (in seconds) to indicate how long the customer has to add suggested products to their order
    • Choose template for post purchase when suggest multiple products: Select the layout for suggesting multiple products
      • Use checkbox to select product
      • Add to order button for each product
    • Limit quantity of product suggestion: Set a limit on the number of suggested products that can be displayed in the Post Purchase section
    • Discount: Offer a discount on the suggested products, either by
      • Percentage. E.g. 10%
      • Fixed amount. E.g. $5
  2. Messages & Localization: Customize the text for the Post Purchase section:
    • Heading message: The main title displayed above the suggested products
    • Subtotal: The label for the subtotal of the order
    • Discount: The label showing the discount applied to the suggested products.
    • Shipping: The label for shipping costs
    • Taxes: The label showing applicable taxes
    • Add to order: The button text for adding suggested products to the order
    • Decline: The button text for declining the suggested products
    • Total: The label showing the final total after any discounts and additional items are added


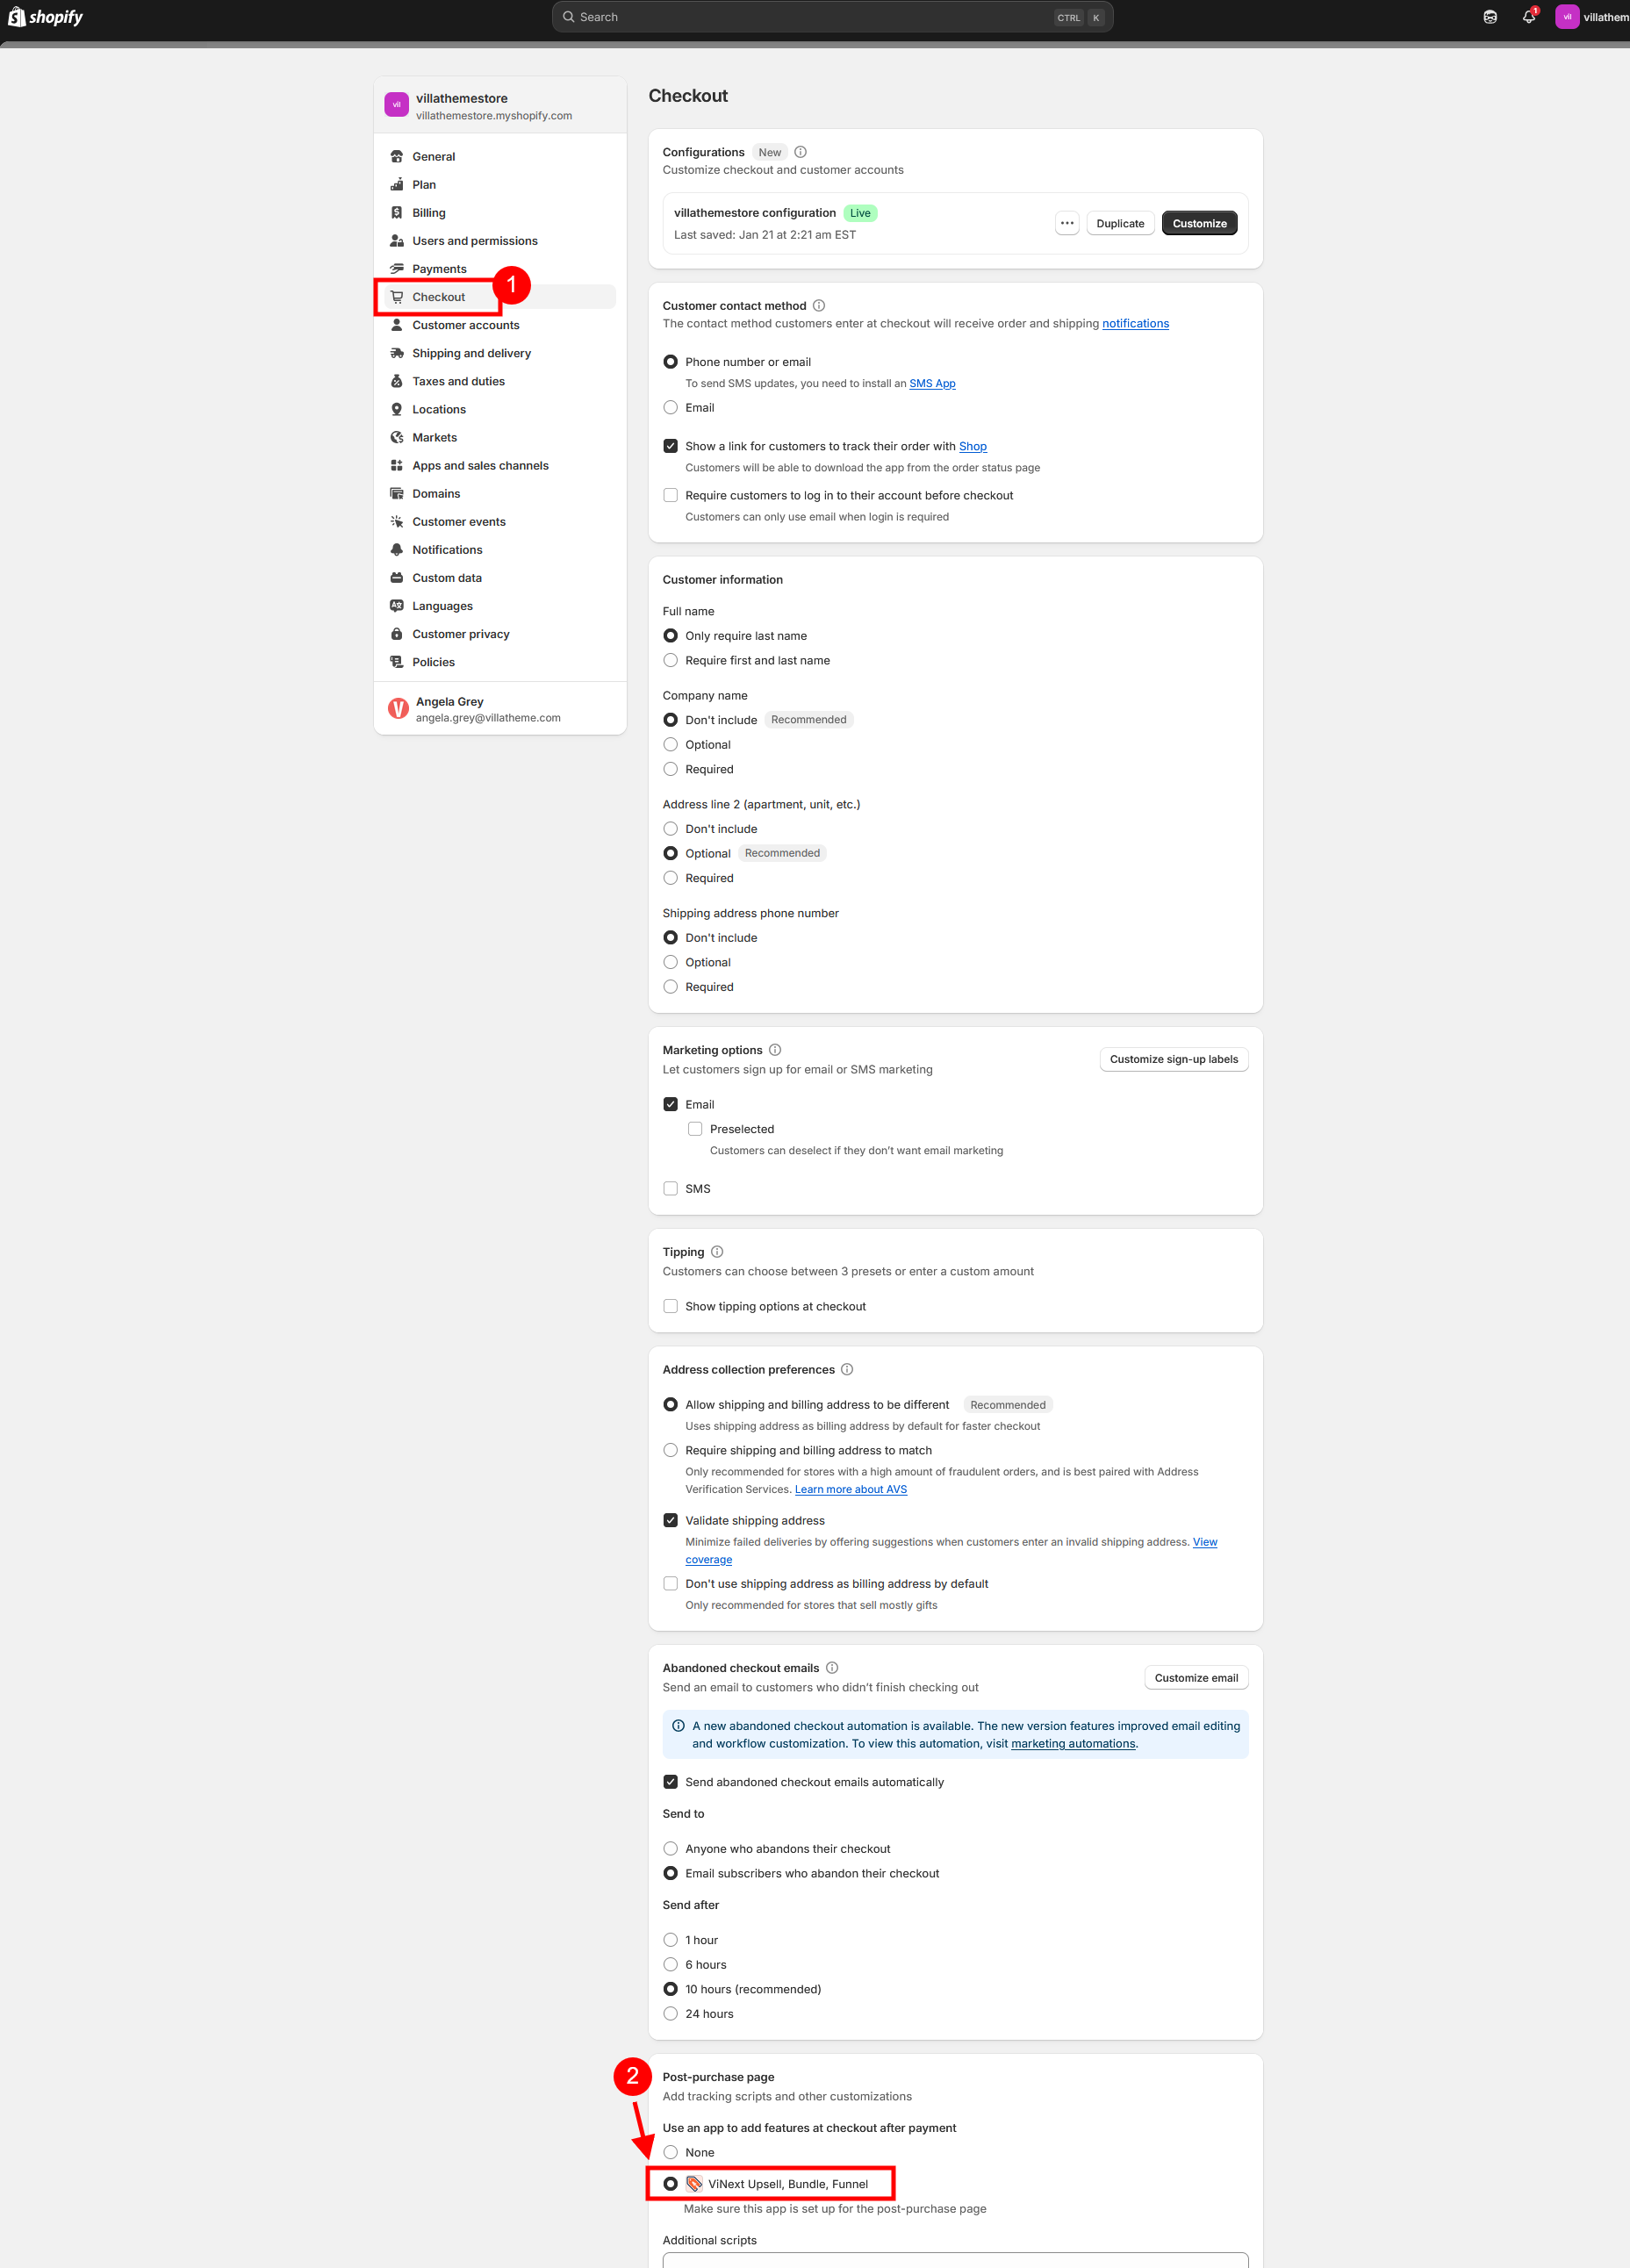
Requirement to show Post Purchase offer

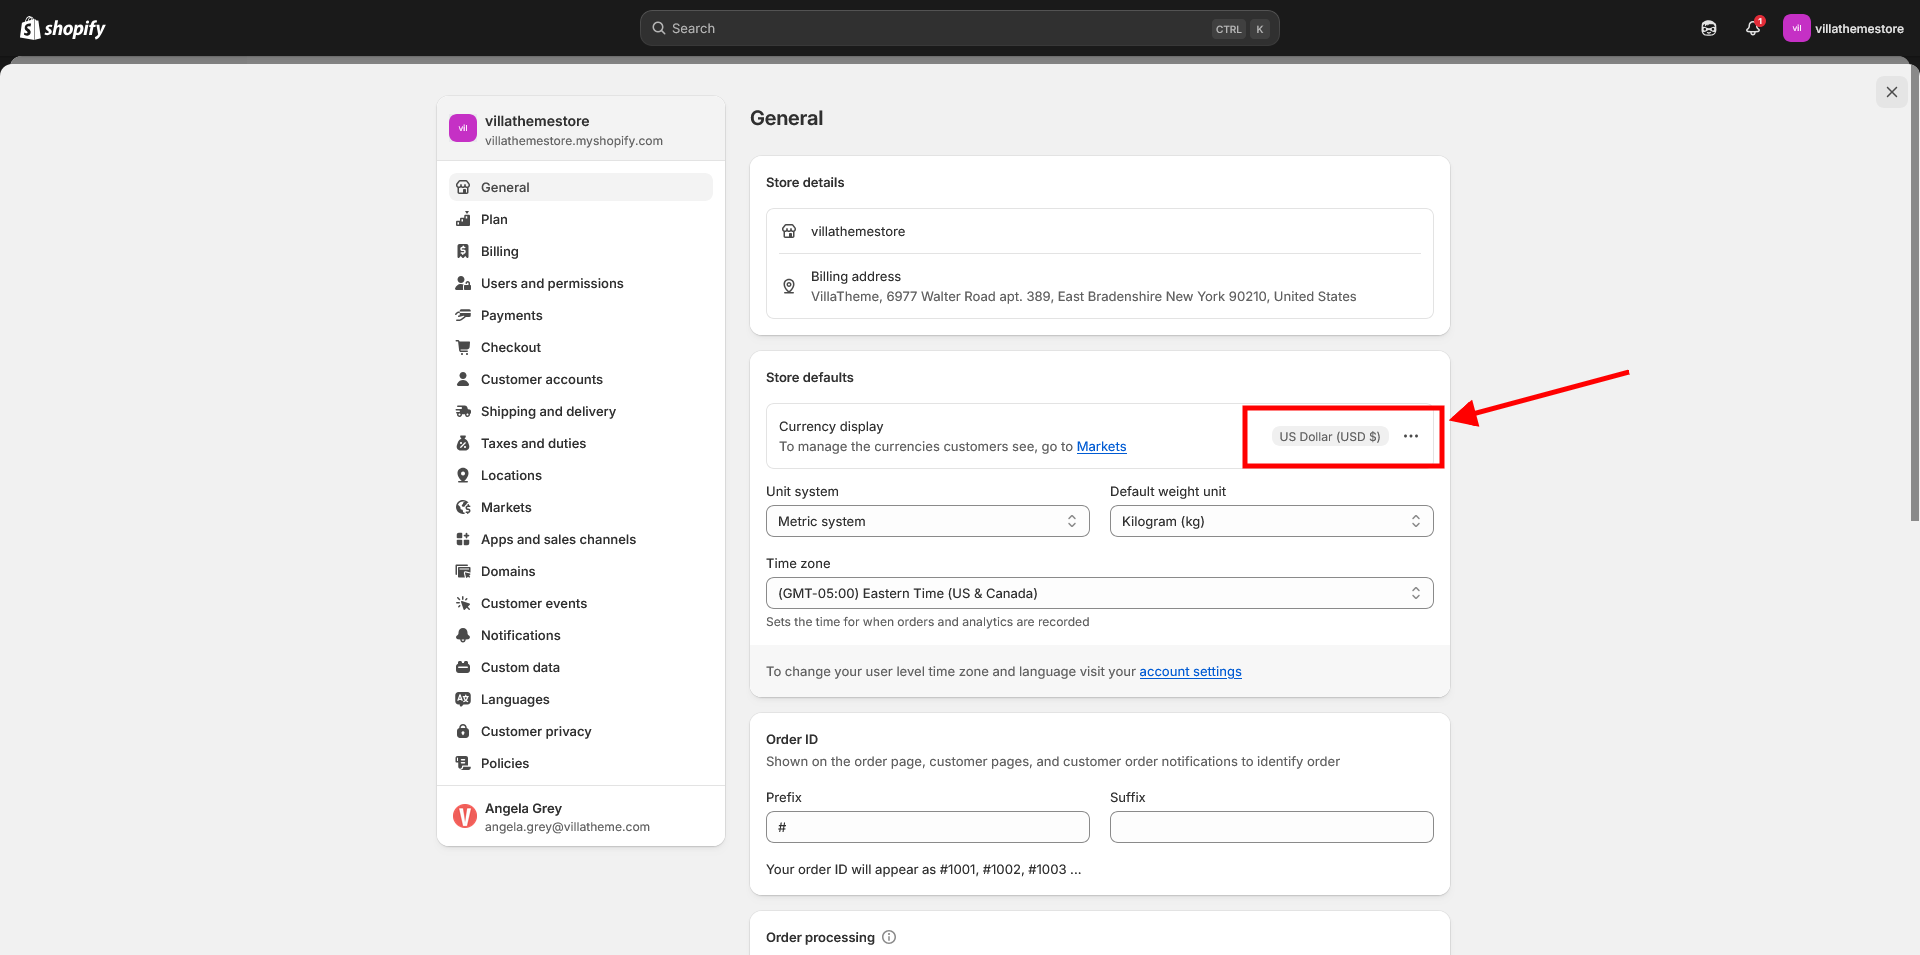
  1. The checkout currency must match the store’s default currency for the Post Purchase offer to appear.
  2. Go to Store Settings > Checkout > Select the app under Post-Purchase Page Setup to enable the feature.


How It Appears on the Store front end

After Order Payment: Once a customer completes their payment
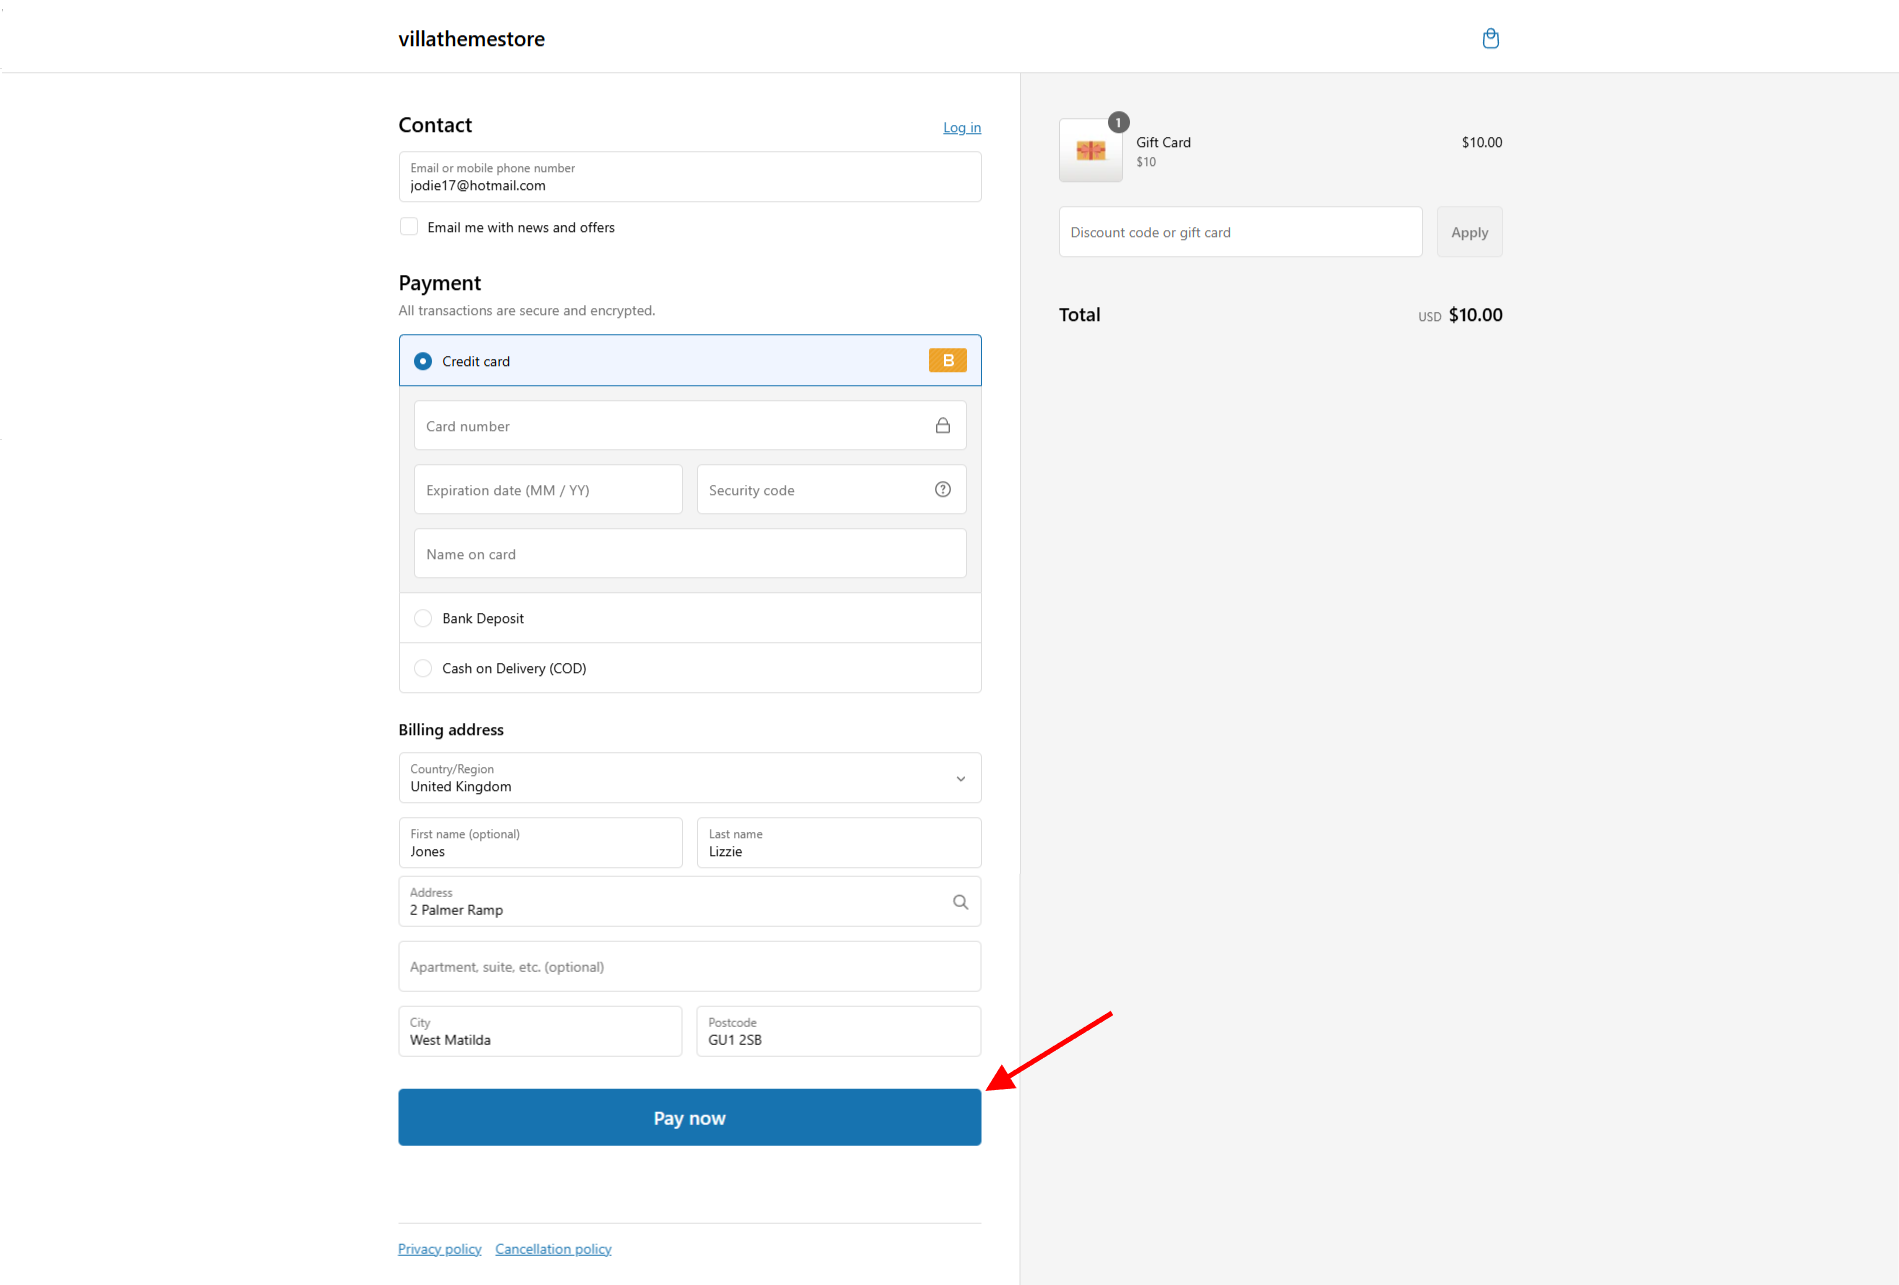
 

The Post Purchase section will appear on the confirmation page, showing suggested products based on your settings (cross-sell or same collection)
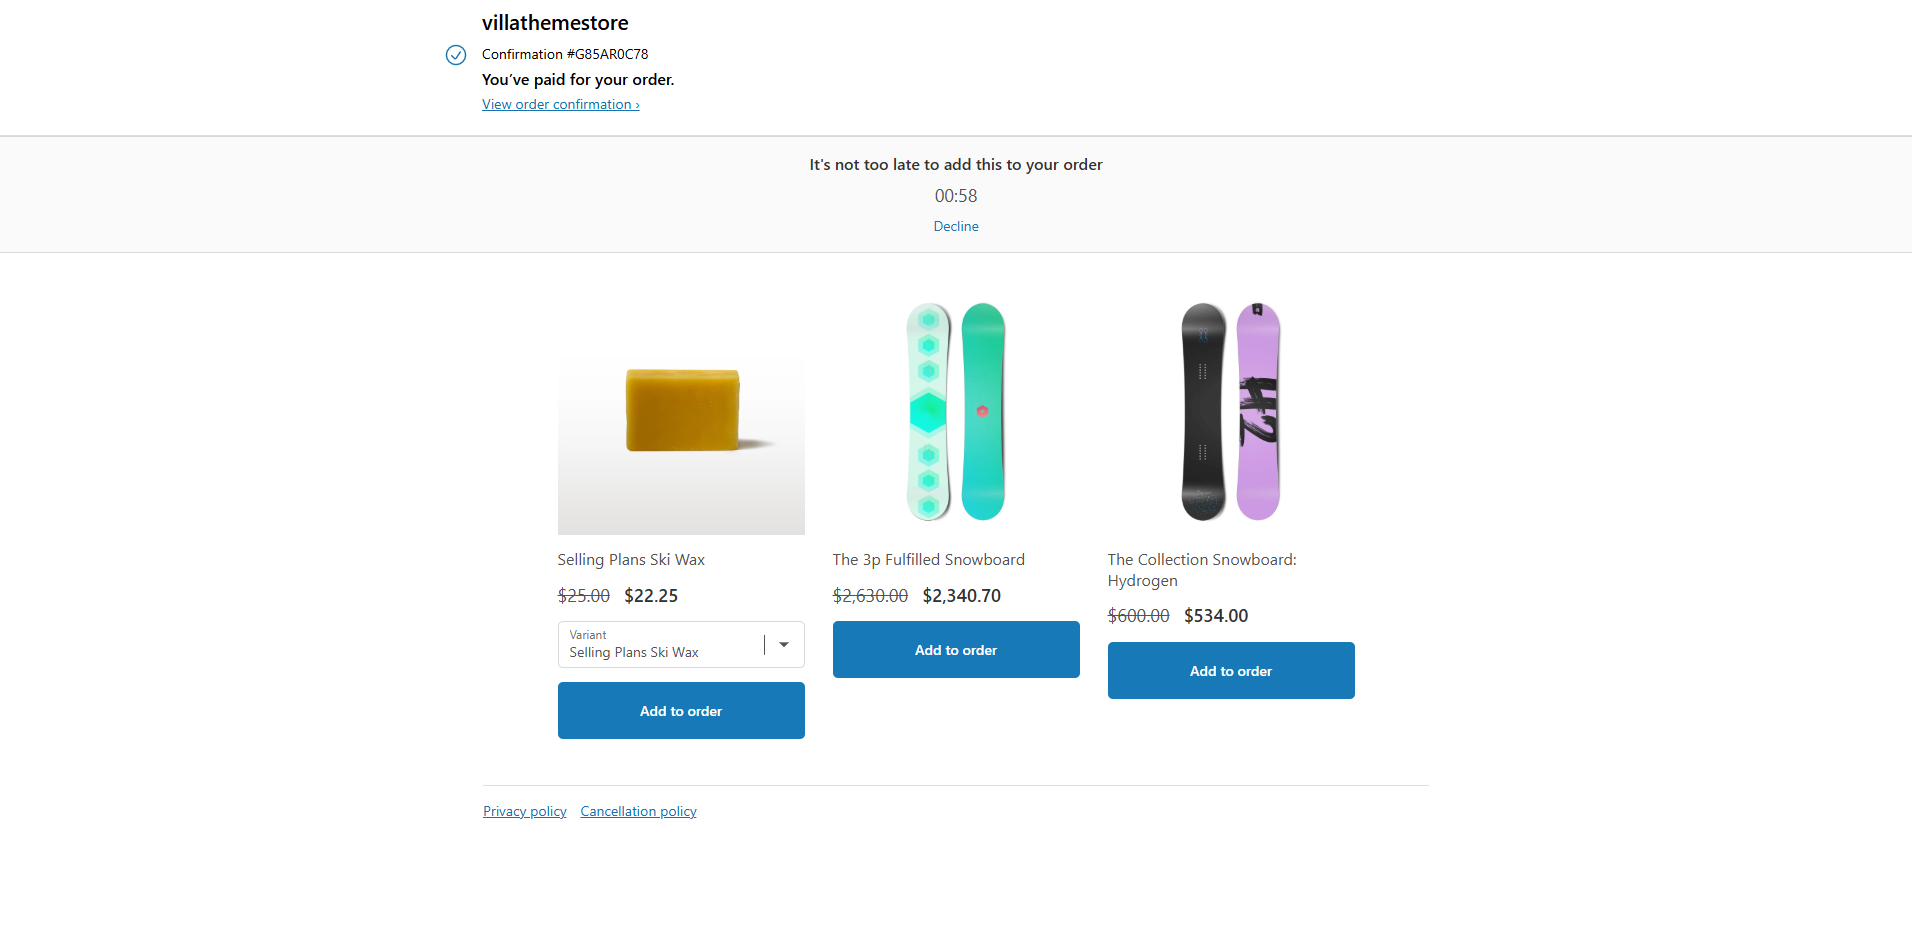
  • Add to order button for each product
  • Use checkbox to select product


Settings – Discount Bar

The Discount Bar is a popup that appears when customers add a product to their cart, showing the discount they unlock. Once the discount conditions are met, the bar congratulates them and can even redirect them to checkout automatically.
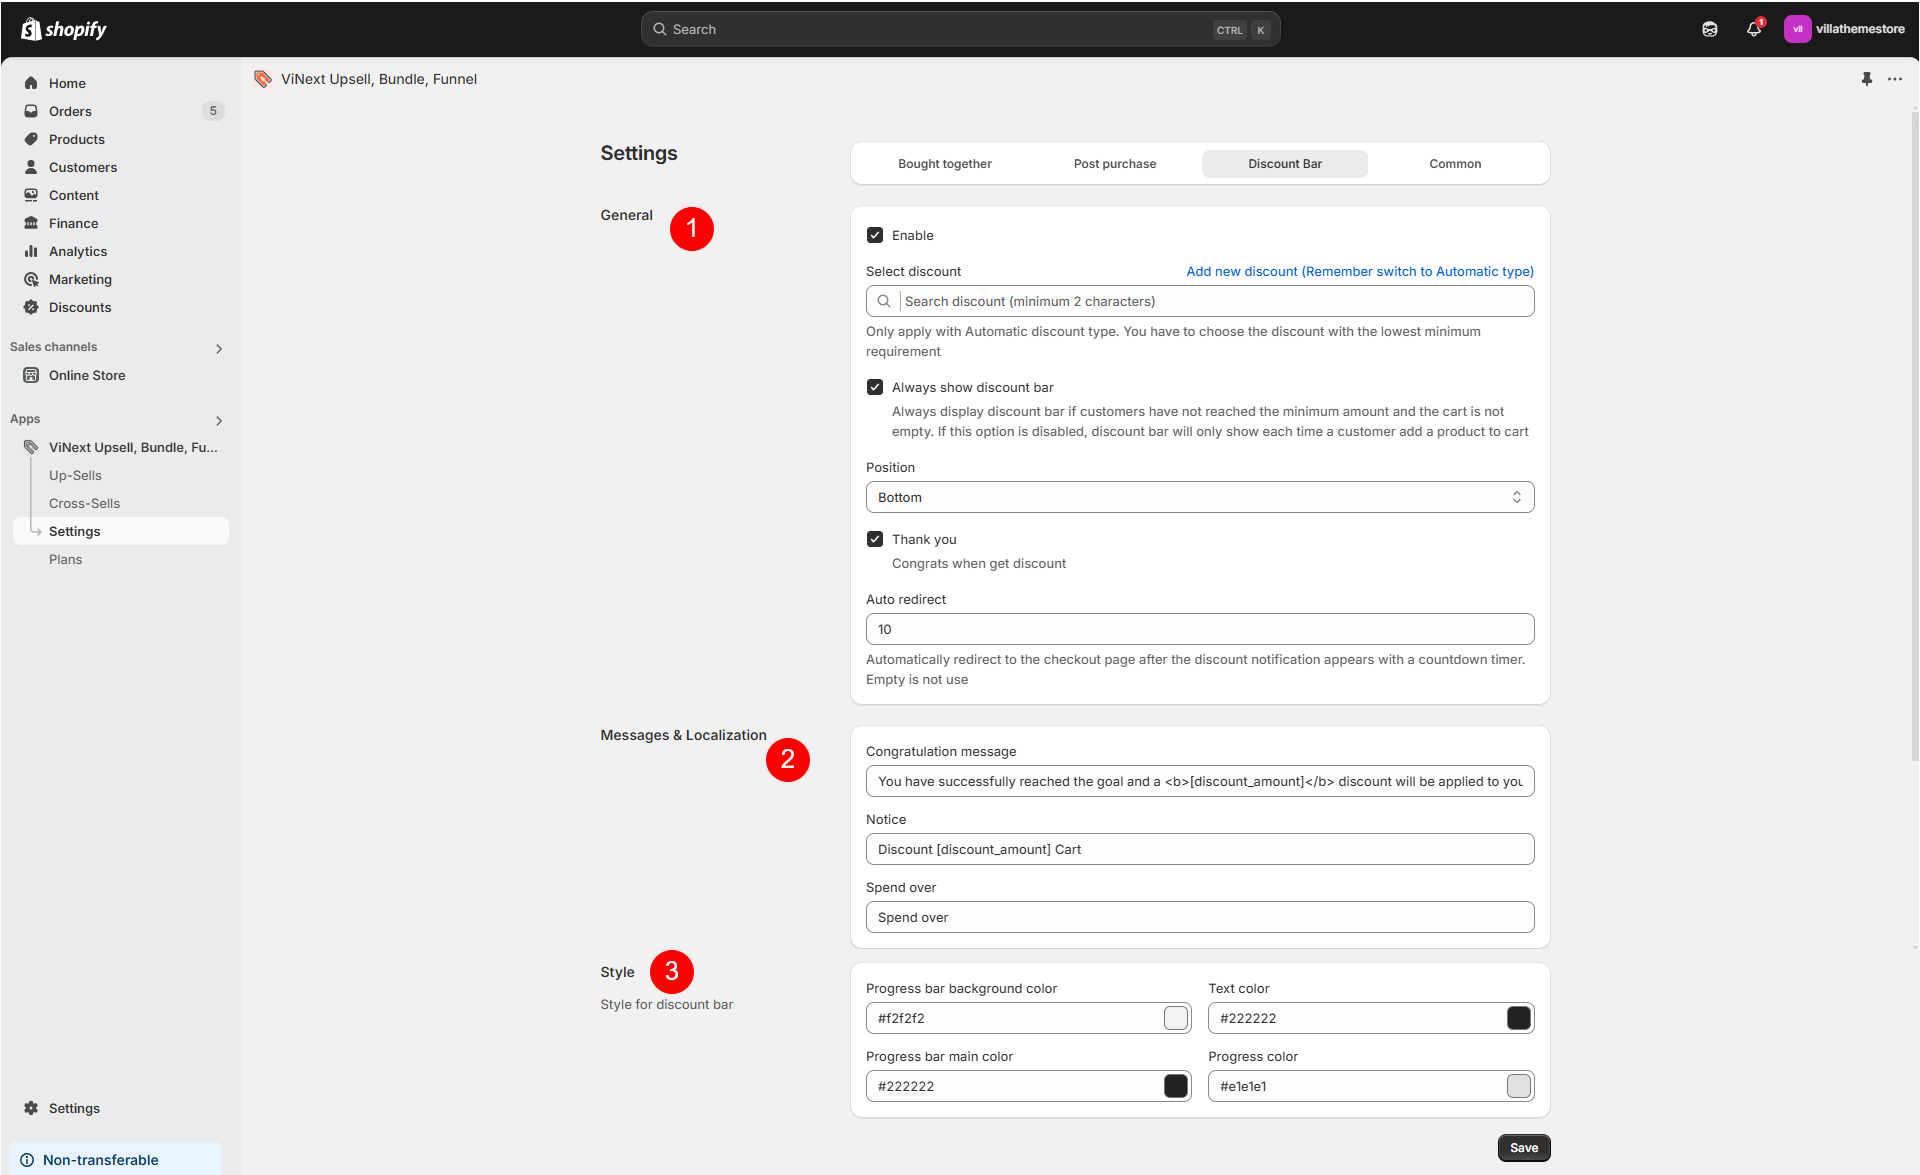
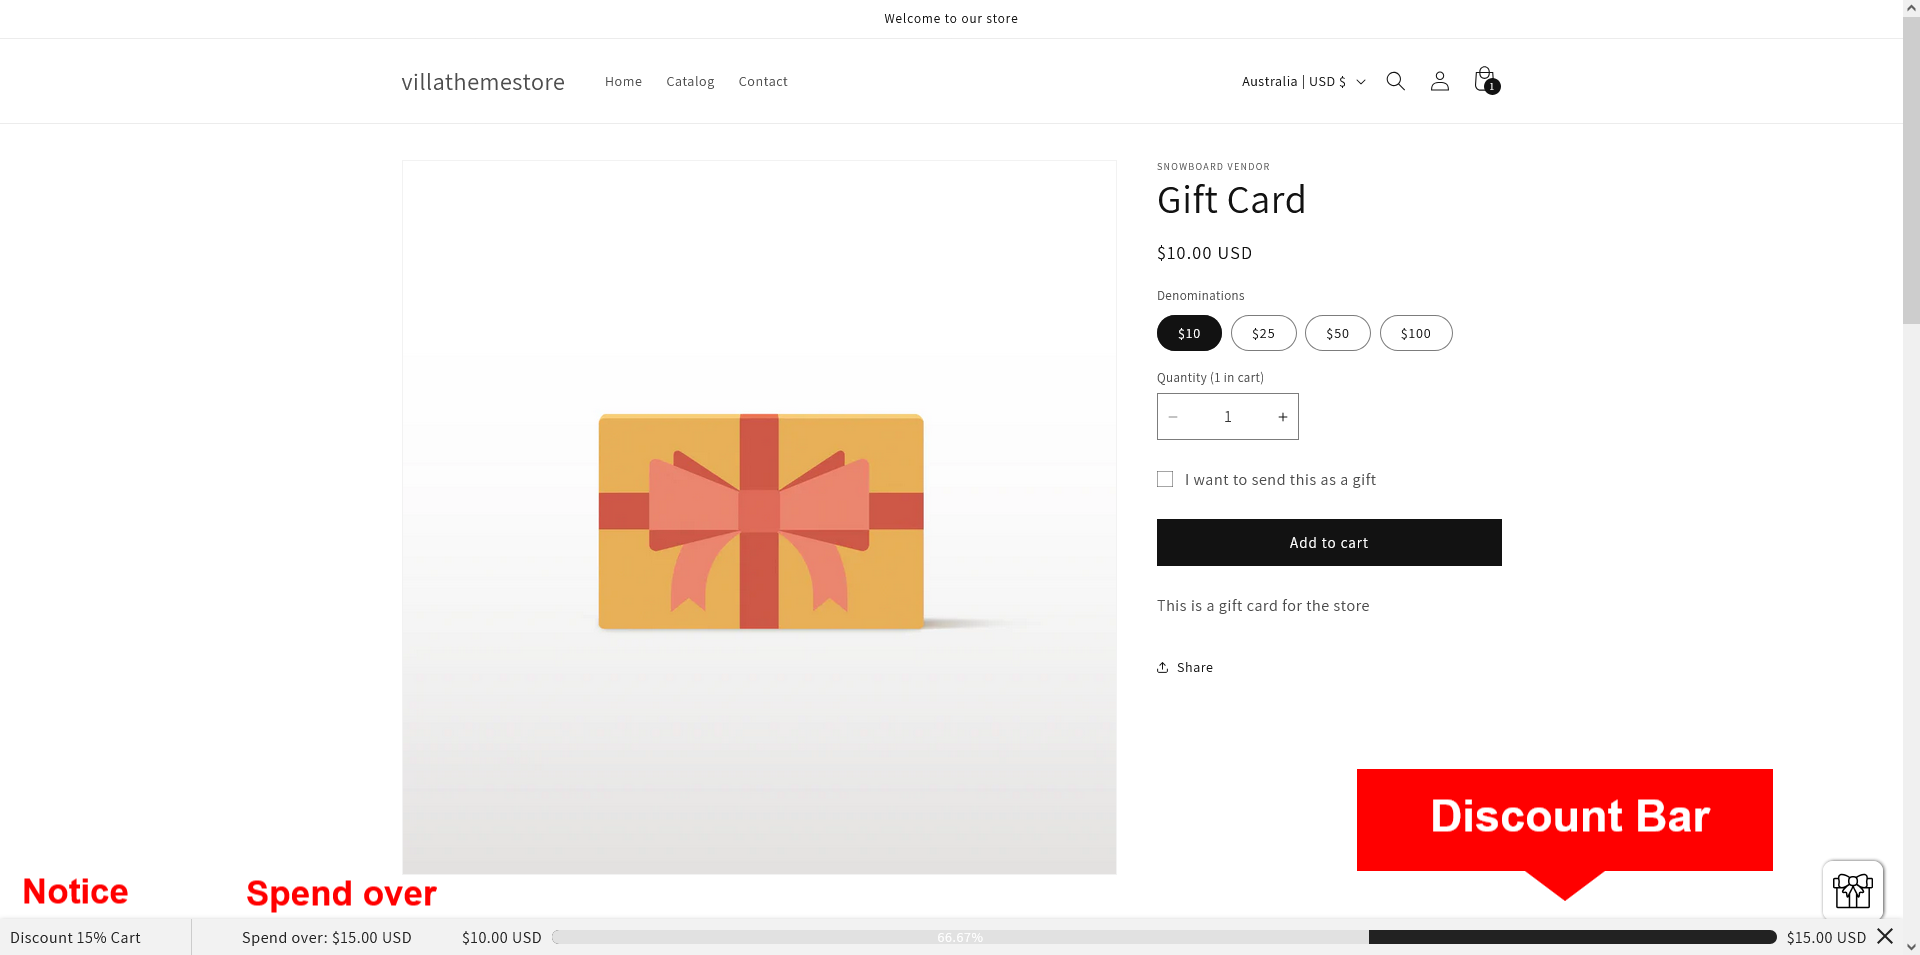
 

  1. General
    • Enable: Turn the Discount Bar on or off
    • Select discount: Choose an existing automatic discount from your Shopify store. The app only works with automatic discounts, and you must select the discount with the lowest minimum requirement to ensure proper application
    • Always show discount bar: Make the bar visible if the cart is not empty even if the customer hasn’t met the discount condition yet
    • Position: Choose where the bar appears
      • Top: Display at the top of the page
      • Bottom: Display at the bottom of the page
    • Thank you: Customize the congratulatory message that appears when the customer qualifies for the discount
    • Auto redirect: Set a countdown timer (in seconds) to automatically redirect customers to the checkout page after they qualify for the discount. Leave this field empty if you don’t want to enable auto-redirect
  2. Messages & Localization: Customize the content of the Discount Bar messages
    • Congratulation message: The message displayed when the customer qualifies for the discount (shows up when you check the “Thank you” checkbox in General settings)
    • Notice: A general message about the discount
    • Spend over: The message showing how much the customer needs to spend to unlock the discount
  3. Style: Adjust the appearance of the bar
    • Progress bar background color: The background color of the bar
    • Text color: The color of the text inside the bar
    • Progress bar main color: The primary color of the progress bar
    • Progress color: The color showing the progress towards unlocking the discount


How it appears on the Store front end

  1. Before the discount is unlocked

  2. After meeting the discount condition


Settings – Common

The Common page allows you to customize the text and button styles used throughout the app.
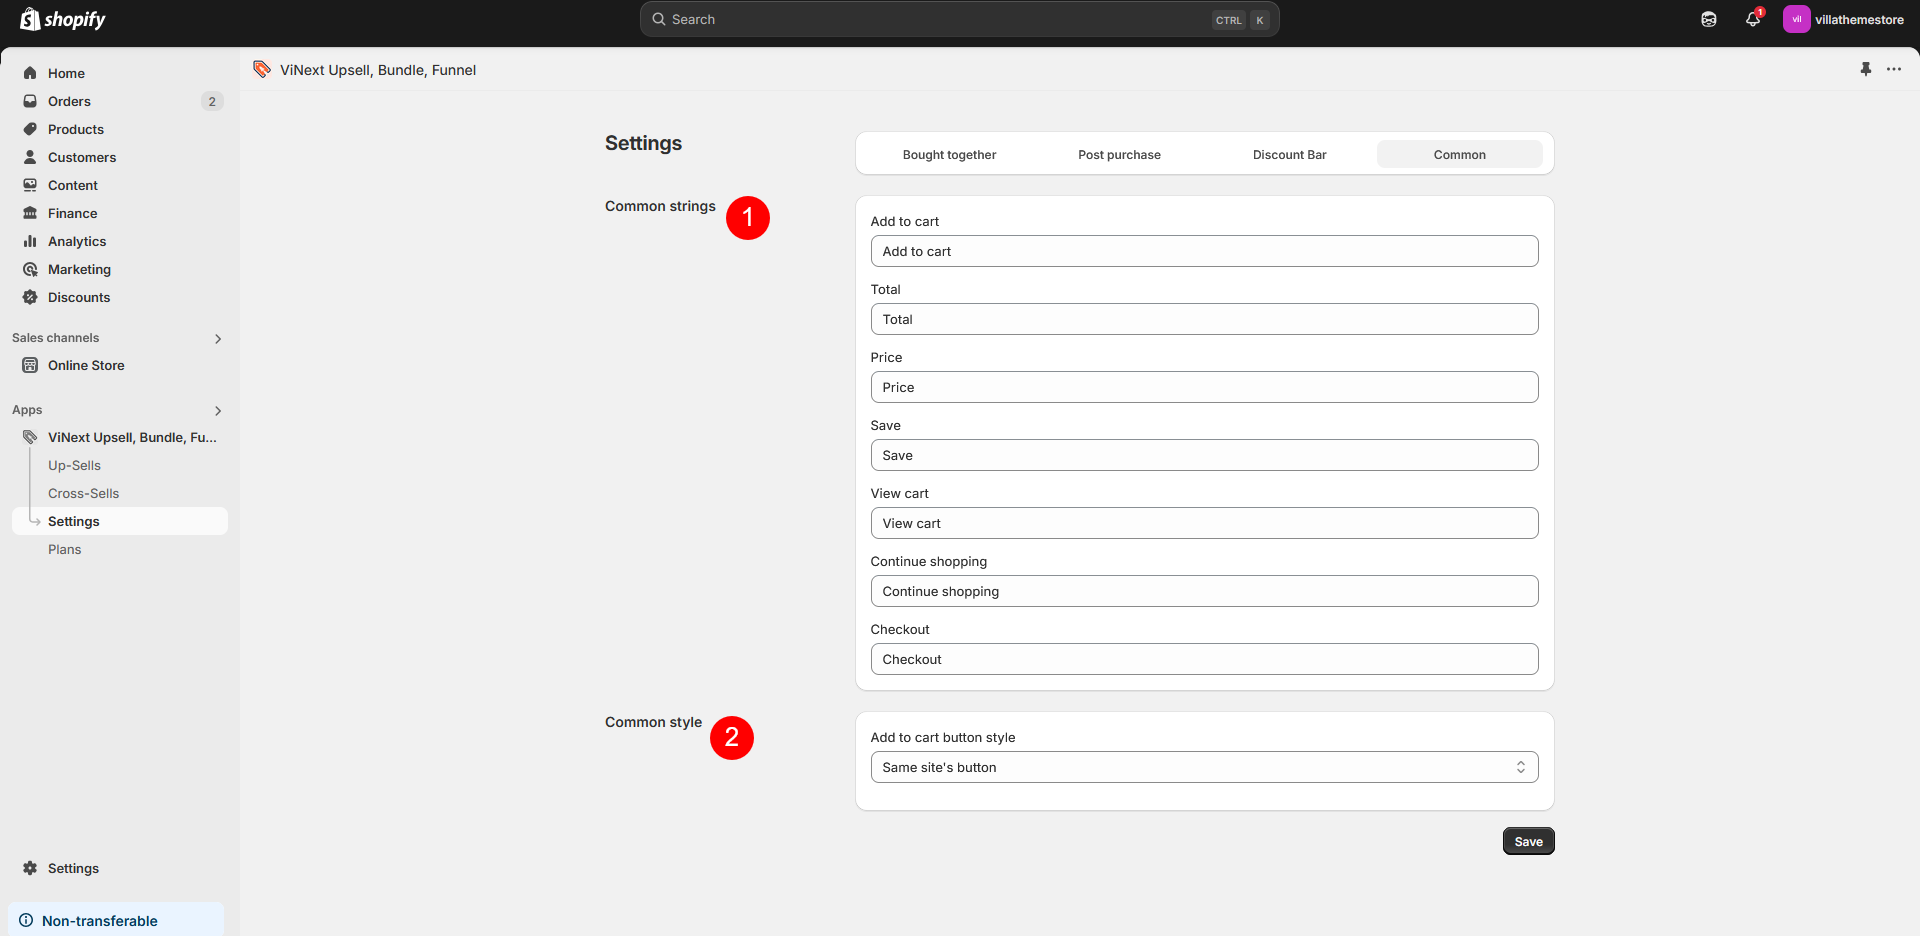
  1. Common strings: Use these input fields to change the default text that appears in various parts of the app:
    • Add to cart: The button text for adding a product to the cart.
    • Total: The label for the total price of selected products.
    • Price: The price display label.
    • Save: The text showing how much customers save on a discounted bundle or upsell.
    • View Cart: The button text for viewing the cart.
    • Continue Shopping: The button text for returning to the shop.
    • Checkout: The button text for proceeding to checkout.
  2. Common style: Customize the look of the Add to Cart button. Choose between
    • Same as site’s button: The button will match your store’s existing style.
    • Custom: Allows you to customize the button’s appearance. If selected, you can adjust:
      • Button Text Color: Choose a custom color for the text inside the button.
      • Button Color: Set a custom background color for the button.